Partition your Acronis Disk Director Suite hard drive. Changing partitions on a hard drive using Acronis Disk Director How to partition a volume using acronis
For many PC users, working on the simplest setup of the operating system causes a feeling of fear and doubt in their own abilities. In turn, attempts to solve more complex problems that require additional knowledge self-destruct.
A striking example of this is the desire to split a computer’s hard drive (HDD) into several logical partitions using the Acronis program.
Many users are of the opinion that working in Acronis Disk Director Suite is incredibly difficult, but we hasten to inform you that this is absolutely not the case.
This article will tell you in detail how to work with this program. Of course, we will not consider everything, but will cover the most basic manipulations with the HDD.
Instructions for creating logical disks in Acronis Disk Director
Let's launch the program.
If this is the first time you see the Acronis interface and do not know how to work with the program, then select “Automatic mode”. The most basic functions will be available in it.
Over time, when the key points are clear, you can experiment in “Manual Mode”.
As a result, we see the following:

You need to click on the “Wizards” menu item.

As a rule, the first two points are the most in demand in work.
Let's look at “Creating partitions”
For example, we have a 1 TB hard drive. Please note that this means that the computer has one HDD installed. In our example, the HDD is initially divided into three local partitions, and we will create another one, for this: click on the item in the menu “Wizard” -> “Create partitions”, as a result we see the following:

To create a new partition we will use the space from drive “E”.


During this process, Acronis will lock the partitions. In this state, you cannot change files and folder contents.

As you can see in the screenshot, it is possible to use only 354.4 MB.
note. Before partitioning the disk, it is necessary and only then to use its space.

Important. If the partition being created is needed only for storing files, then select the “Logical” type. If to install the system, then “Active”. By switching partition types, you can study their purpose in detail.
This example shows how to create a logical drive to house data files.


We don’t enter anything and continue.

If Windows contained all the functionality that is implemented using third-party software, just to install the operating system you would need a mega-flash drive with an impressive weight. But this is not even the main problem. Imagine the horror that would grip the inexperienced minds of computer neophytes if they were faced with a hyperflow of information hitherto unknown to them. Therefore, the operating system can only be the basis for unlocking the potential of a computer given the vector set by the user’s interests.
And sometimes the standard capabilities of the operating system can have a kind of “underformat” - get something frivolous for free, and, if you please, look for sensible things on the side and for a fee. For example, to work with partitions of a computer's hard drive, Windows has a disk management utility in its arsenal of standard tools. But its capabilities are very limited: the maximum that can be done in terms of reorganizing disk space is to create one partition at the expense of the volume of another.
To carry out any more or less serious operations with disk partitions, you must resort to the help of special programs - disk managers. The leading position in the software market in this niche is occupied by Acronis Disk Director, a professional product for system administrators that provides extensive functionality for working with computer disk space.
About Acronis Disk Director 12
Among other functions, the latest current version of Acronis Disk Director 12 provides for resizing disk partitions, copying and moving them, splitting and merging without losing existing data. Acronis Disk Director 12 can be written to bootable media to work with disk partitions on a computer without an operating system installed.
Acronis developer products, including the Disk Director disk manager, are paid. The free demo version of Acronis Disk Director 12, which can be freely downloaded from the program’s official website after registering with an email address, will be of little use. Any operations to organize disk space can be carried out only if the volume size does not exceed 100 MB.
This is a negligibly small volume, and, as we see, we are simply being asked to play around on a small scale in order to test the program. Therefore, to distribute disk space, we will immediately use the paid version. At the time of writing this article, Acronis offers to purchase Disk Director 12 for 1,600 rubles.
Dividing the hard drive into two partitions
Let's look at an example of dividing a hard drive into two partitions. We have a 100 GB hard drive, on which there is a single partition - drive C, which was created automatically during the Windows installation process. In our case, we will leave the system only 30 GB of space, and from the remaining disk space we will form a non-system partition - disk D. This example of disk space distribution is a test one, and it is not exemplary. In fact, to realize the capabilities of modern versions of Windows, a system partition of approximately 100 GB in size is precisely what is required. But, regardless of the size of the hard drive, regardless of whether we are dealing with a classic hard drive or an SSD drive, the program’s operating procedure will be the same.
Acronis Disk Director 12 takes away excess space from the system partition without losing data or crashing the operating system. Naturally, the space taken from the system disk must be free.
In the main window of the program we will see a clear picture of the existing disk partitions, and to change it, in our case, call the context menu on the system partition and select the volume partition command. The same command is duplicated by a separate option on the toolbar on the right.

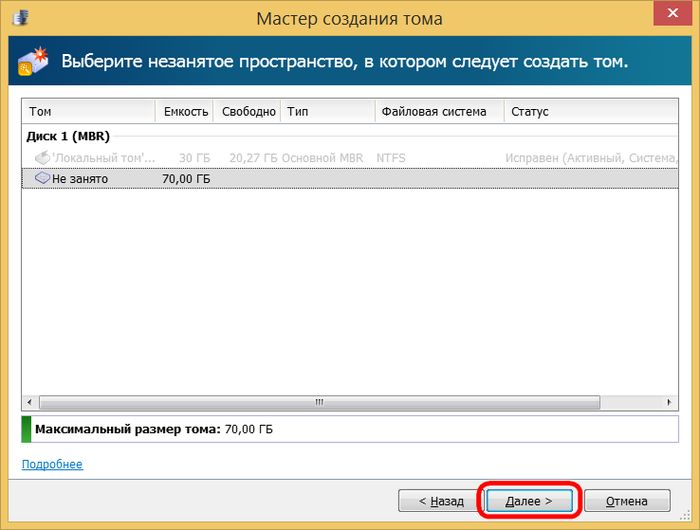
In the new window, set the size of the space taken from the system disk, which will be formed into a new partition. In our case, in the “New volume size” column we will set 70 GB. Click "Ok".

Returning to the Disk Director window, we will see the future picture of disk space distribution. To apply the performed operation, click the corresponding button at the top of the program window.


The computer will reboot and Disk Director will enter preboot mode, where it will redistribute the disk partitions.

After starting the system, in the program window we will see exactly the picture of the disk partitions that we planned.
 Forming several disk partitions at once
The process of forming a second disk partition at the expense of the space of the first is discussed above. It will do if you need to do anything, it is to divide the section into two parts. But if we are talking about a radical redistribution of disk space with the creation of several partitions, Acronis Disk Director 12 has more convenient functionality for these purposes. Let's look at how to create several disk partitions from one at once using the volume resizing function.
So, again we have a hard drive with the operating system installed on the only system partition. Right-click on it and select resizing the volume.

In the “Volume Size” column, set the system partition to 30 GB. Click "Ok".

Returning to the main Acronis Disk Director window, we will see that the remaining disk space is now indicated as unallocated space. We call up the context menu on the latter and select the only thing that is offered to us - “Create volume”.


The next step of the wizard is to set the size for the new partition. In our case, we will again allocate 30 GB and get disk D. Click “Finish”.

After this, in the main program window we will see a future picture of the disk partitions with two formed and the remaining 40 GB of unallocated space. Let's create the third section. Call the context menu again on an unoccupied space and repeat the procedure for creating a volume.

In the window for setting the size for the partition to be created, traditionally for our case, we will indicate 30 GB and complete the process of creating disk E.

In the main program window we will now see three partitions and 10 GB of unallocated space. Let's define them in a small partition of the disk. Again the context menu, again volume creation.

We give all the remaining space to drive F. We complete the process.

All available disk space has been distributed across partitions; now all that remains is to apply all these changes. At the top of the program window, click the button to apply scheduled operations.

As in the previous case, this will be followed by an information window with the parameters of the operation being carried out and confirmation of the reboot.

Well, after Acronis Disk Director 12 carries out the operation in preboot mode and Windows starts, we will already observe the results of its work - instead of one partition, in our case there will be four.

By the way, you will find many interesting articles on this and other topics from our colleagues at inforkomp.com.ua.
How to partition a computer's hard drive using Acronis Disk Director 12=
If Windows contained all the functionality that is implemented using third-party software, just to install the operating system you would need a mega-flash drive with an impressive weight. But this is not even the main problem. Imagine the horror that would grip the inexperienced minds of computer neophytes if they were faced with a hyperflow of information hitherto unknown to them. Therefore, the operating system can only be the basis for unlocking the potential of a computer given the vector set by the user’s interests. And sometimes the standard capabilities of the operating system can have a kind of “underformat” - get something frivolous for free, and, if you please, look for sensible things on the side and for a fee. For example, to work with partitions of a computer's hard drive, Windows has a disk management utility in its arsenal of standard tools. But its capabilities are very limited: the maximum that can be done in terms of reorganizing disk space is to create one partition at the expense of the volume of another. To carry out any more or less serious operations with disk partitions, you must resort to the help of special programs - disk managers. The leading position in the software market in this niche is occupied by Acronis Disk Director, a professional product for system administrators that provides extensive functionality for working with computer disk space.
About Acronis Disk Director 12 Among other functions, the latest current version of Acronis Disk Director 12 allows you to resize disk partitions, copy and move them, split and merge without losing existing data. Acronis Disk Director 12 can be written to bootable media to work with disk partitions on a computer without an operating system installed. Acronis developer products, including the Disk Director disk manager, are paid. The free demo version of Acronis Disk Director 12, which can be freely downloaded from the program’s official website after registering with an email address, will be of little use. Any operations to organize disk space can be carried out only if the volume size does not exceed 100 MB.
Dividing a hard drive into two partitions Let's look at an example of dividing a hard drive into two partitions. We have a 100 GB hard drive, on which there is a single partition - drive C, which was created automatically during the Windows installation process. In our case, we will leave the system only 30 GB of space, and from the remaining disk space we will form a non-system partition - disk D. This example of disk space distribution is a test one, and it is not exemplary. In fact, to realize the capabilities of modern versions of Windows, a system partition of approximately 100 GB in size is precisely what is required. But, regardless of the size of the hard drive, regardless of whether we are dealing with a classic hard drive or an SSD drive, the program’s operating procedure will be the same. Acronis Disk Director 12 takes away excess space from the system partition without losing data or crashing the operating system. Naturally, the space taken from the system disk must be free. In the main window of the program we will see a clear picture of the existing disk partitions, and to change it, in our case, call the context menu on the system partition and select the volume partition command. The same command is duplicated by a separate option on the toolbar on the right.
In the new window, set the size of the space taken from the system disk, which will be formed into a new partition. In our case, in the “New volume size” column we will set 70 GB. Click "Ok".
Returning to the Disk Director window, we will see the future picture of disk space distribution. To apply the performed operation, click the corresponding button at the top of the program window.
Next, click “Continue” in the information window with the parameters of the operation being performed, after which we agree to restart the computer. The computer will reboot and Disk Director will enter preboot mode, where it will redistribute the disk partitions. After starting the system, in the program window we will see exactly the picture of the disk partitions that we planned. Forming several disk partitions at once The process of forming a second disk partition at the expense of the space of the first is discussed above. It will do if you need to do anything, it is to divide the section into two parts. But if we are talking about a radical redistribution of disk space with the creation of several partitions, Acronis Disk Director 12 has more convenient functionality for these purposes. Let's look at how to create several disk partitions from one at once using the volume resizing function. So, again we have a hard drive with the operating system installed on the only system partition. Right-click on it and select resizing the volume. In the “Volume Size” column, set the system partition to 30 GB. Click "Ok". Returning to the main Acronis Disk Director window, we will see that the remaining disk space is now indicated as unallocated space. We call up the context menu on the latter and select the only thing that is offered to us - “Create volume”. The Create Volume Wizard will launch. Click “Next”.
Acronis Disk Director– one of the most powerful software packages for working with drives.
Today we’ll figure out how to use Acronis Disk Director 12, and specifically, what steps need to be taken when installing a new hard drive into the system.
First of all, you need to connect the hard drive to the motherboard, but we will not describe this step, since it does not quite fit the topic of the article and usually does not cause difficulties for users. The main thing is to remember to turn off your computer before connecting.
So, the hard drive is connected. We start the machine and, in the folder "Computer", we don’t see any (new) disk.

It's time to turn to Acronis for help. We launch it and find an uninitialized disk in the list of devices. For further work, the drive must be initialized, so click on the corresponding menu button.

The initialization window appears. Choosing a partition structure MBR and disk type "Base". These options are appropriate for drives used to install the operating system or to store files. Click "OK".

Creating a section
Now let's create a section. Click on the disk ( "Unoccupied space") and press the button "Create Volume". In the window that opens, select the partition type "Base" and press "Further".

Select our unallocated space from the list and again "Further".

In the next window, we are asked to assign a drive letter and label, specify the partition size, file system and other properties.
We leave the size as is (the entire disk), we also do not change the file system, as well as the cluster size. We assign the letter and label at our discretion.
If the disk is going to be used to install the operating system, then it must be made Primary, this is important.

Preparation is complete, click "Complete".
Application of operations
In the upper left corner there are buttons for canceling actions and applying pending operations. At this stage, you can still go back and correct some parameters.
We are happy with everything, so we click on the big yellow button.

We carefully check the parameters and, if everything is correct, then click "Continue".


Done, the new hard drive has appeared in the folder "Computer" and ready to go.

Like this, with the help Acronis Disk Director 12, we installed and prepared a new hard drive. There are, of course, system tools for performing these actions, but working with Acronis is easier and more pleasant (author’s opinion).
How to partition an Acronis hard drive? Before dividing the hard drive into partitions, let's figure out why this is necessary.
Important! All actions you do are on at your own risk.
There are several programs that can perform any actions with partitions, I will focus on (a convenient, simple program in Russian) with which you can painlessly and without the risk of data loss perform operations on a hard drive, partition it.
To don't lose data, it’s worth partitioning your hard drive using Disk Director Suite without being in Windows. To do this, we need to burn the Acronis Disk Director Suite disk image to a CD, set the computer to boot using a CD-ROM or DVD-ROM - you can read and. Having completed these actions we see:
Choose Full version, if it doesn’t start - Safe
Manual mode - OK.

After each operation don't forget to press the button Execute!

Let's assume we don't have a single partition, we need to select the unallocated area, click Wizards - Creating a section

You can set the size of the partition to be created by moving the slider or entering the desired value in

Should choose Partition type Active. Active is intended for installing an operating system on it, Logical contains only files (D, E)

For Windows XP and 7, select the file system NTFS

Increase the size of partition C: Select section C, press Increasing free space

select section C ,
the size of which needs to be increased

select size D or another where there is free space


If you only have drive C, but you need to create D and so on, you need to click
tags: partition Acronis Disk Director Suite hard drive