Displaying messages to the user in web applications. PHP AJAX CRUD: creating, deleting, editing records in the MySQL database PHP script for CRUD operations
The built in notification system, first ever in Joomla, allows your app to keep the user (or group of users) informed about various different events. Think of notifications as important alerts that user would be interested in reading and keeping track of it.
Notifications can be generated everywhere. In your component or plugins and later displayed inside JomSocial notification system.
This tutorial will show you how, but since we do not have idea of any third-party component we could use:) the examples will be done on a community plugin which will be triggered at onAfterProfileUpdate event
If you don"t know how to create a plugin which will be triggered on this event, we suggest you to check this guide
As stated in overview of this tutorial, we will generate notifications using community plugin.
You will most likely want to create notifications inside your component, or your plugin. The following tutorial will work in any of this cases. You only need to determine at what point in your code the notification will be created and just load the JomSocial Core Libraries file.
require_once JPATH_ROOT . "/components/com_community/libraries/core.php" ;
Following the tutorial explained below will work just fine for your extension too
Preparing the Development Environment1. We will assume that you"re already created community type example plugin which will be triggered when user changes its profile
If not, you can download empty example plugin from , install it in Joomla and enable the plugin. It is named Community - Notifications Example
2. Navigate to your database and empty these two tables, so they dont have any records at all
A) prefix_community_notification
b) prefix_community_mailq
3. Have at least two (2) users at your test sites and know their ID"s
In earlier versions of Joomla, user ID"s have always started from specified number (62, 42) In Joomla 3, this number will be random, hence, the picture of our testing environment because it will definitely be different at your end.
The First NotificationOpen the plugin php file which will be located in ROOT/plugins/community/example
Within the function onAfterProfileUpdate() replace the
CNotificationLibrary::add ( $cmd , $actor , $target , $subject , $body , $template , $params ) ;
As shown on the example, notification add api have 7 parameters
Knowing all this, lets define the variables we will use
Change your plugin code to:
$user = CFactory::getUser(); $cmd = "system_messaging" ; // first param, type of activity $actor = $user -> id ; //second param - get the id of $actor $target = "965" ; // third param. Who receive notification? In our dev environment, its admin user with id 965. At your environment, you will most likely want to get the ID from your object or from array of users. $subject = "Notification Subject" ; // Subject of both, email and popup notifications $body = ; //Body message in emails. $template = "" ; // If you need to use specific jomsocial template file, you can define it here. $params = new CParameter("" ) ; // We want to create an additional params object, and assign data to it, without having to formally define a class CNotificationLibrary:: add ( $cmd , $actor , $target , $subject , $body , $template , $params ) ;
Now login with any user and change the profile information. Lets go to database to see what happened.
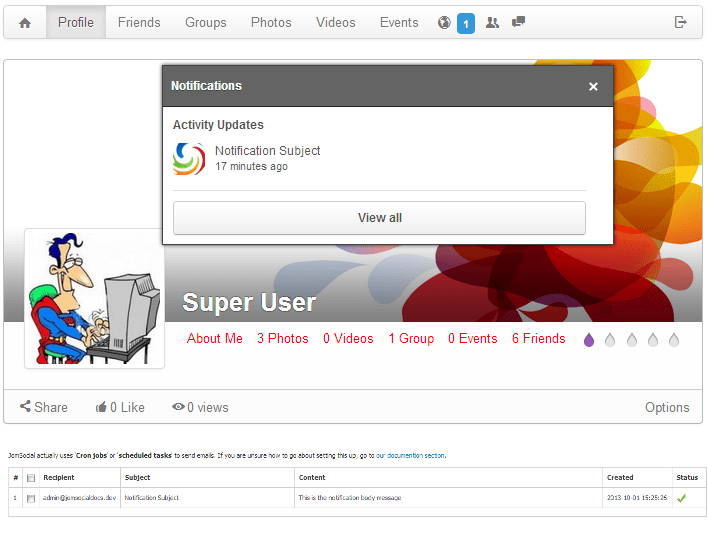
Navigate to prefix_community_notifications table and observe the new record
Navigate to prefix_community_mailq table, and see the new record
Congratulations! - You have successfully created your first very own notification which has been dispatched via email and internal JomSocial notification system
 Potential Code Bloat
 Above example is fine, and it works, but generally it is not recommended to use it like that. Instead, it could be written like this
$actor = CFactory::getUser(); $params = new CParameter("" ) ; CNotificationLibrary:: add ( "system_messaging" , $actor -> "This is the notification body message" , "" , $params ) ;
This is much cleaner and easier to follow while basically doing absolutely the same thing as a code shown above.
Custom Notification ParametersA notification API can be extended with any param you would like to add.
These params can be passed to either email template, notification, and of course, language file.
$actor = CFactory::getUser(); $link = "http://www.google.com" ; $params = new CParameter("" ) ; $params -> set ("actor" , $actor -> getDisplayName () ) ; // can be used as (actor) tag $params -> set ("actor_url" , "index.php?option=com_community&view=profile&userid=" . $actor -> id ) ; // Link for the (actor) tag $params -> set ("url" , $link ) ; //url of the whole activity. Used when hovering over avatar in notification window. Can be used as (url) tag in outgoing emails too. Make sure that you have defined $link variable:) CNotificationLibrary:: add ( "system_messaging" , $actor -> id , "965" , "Notification Subject" , "This is the notification body message" , "" , $params ) ;
- $params = new CParameter( ); - We want to create a new params object, and assign data to it, without having to formally define a class.
- $params->set("actor", $actor->getDisplayName()); - Your notification should always have an actor. This param can be passed to template as (actor) tag. In notification window, it defines the user that carries an action.
- $params->set("actor_url", "index.php?option=com_community&view=profile&userid=" . $actor->id); - Actor URL is usually the url of an actor. In notification popup, it adds the link to the (actor) element
- $params->set("url", $link); - This is the most important parameter you must always set properly. In notification window, this param is used over the avatar image. In email notification, it echoes the location where activity occurred.
For this example, we will set variable $link to lands on www.google.com so you can see how it works
Adding Language String and Use ParamsHaving the params we just set are available to be used in our language files as well.
Lets define the language keys by altering the " CNotificationLibrary::add() API
CNotificationLibrary::add("system_messaging" , $actor -> id , "965" , JText::sprintf("PLG_COMMUNITY_EXAMPLE_SUBJECT" ) , JText::sprintf("PLG_COMMUNITY_EXAMPLE_BODY" ) , "" , $params ) ;
The language file should look like this
PLG_COMMUNITY_EXAMPLE_SUBJECT = "(actor) updated profile" PLG_COMMUNITY_EXAMPLE_BODY = "Hi Admin \n This is the mail to inform you that (actor) updated profile \n\n If you want to go to Google, click here \n a href=" _QQ_" (url)"_QQ_">(url)"
In this example, we have used the tag (actor) and (url) to pass the data to both, notification, and email templates. Lets see how does that look.
In notification window when hovering over avatar, notice the (url) param kicked in and adds the link to google over avatar. It is intentional, because we made it that way:)
In the same window, when hovering over actor link. This is the part where (actor) echoed the user that carries an action, while (actor_url)" taken care that object is linked properly

Lets see what happens in the email queue

And finally, the actual email that is sent to end user

Success
Till now, we created three (3) parameters that are successfully used in notification window, and emails.
Similarly, you can define "
- (target) - if you need it
- (target_url) if you need it in your notification.
- (title) - Commonly used to refer to an object that generated notification. Example: "User X posted new photo in Album Y." Album Y is title here
- (title_url) - As with previous ones, the url of an object that generated notification.
- (message) - This param can be used to set (and echo) the message in the body of JomSocial email.
Displaying messages to the user is a fairly common action that a web application should perform. It can occur when processing forms, it can be error messages, messages that tell you to register when a user tries to access a restricted part of the site, and in many other cases.
Very often, the creation and output of messages are separated into different HTTP requests. As a rule, it is convenient to use a redirect after processing forms (to avoid problems with the Back and Refresh buttons), but at the same time, the natural moment for creating a message is precisely the moment of processing forms and performing actions accompanying it. Why? Imagine that the message text should look something like this: “The number of units ordered for the item ‘Mouse Pad’ has been successfully changed from 7 to 12.” After a redirect, perhaps to a completely different page in terms of functionality, it will be an extra headache to determine what was done before.
Most often, messages are displayed in the POST request that processes the form - this is not good, the words “this page is out of date” ruin life (when the user decides to try the Back button).
Someone uses a redirect, giving up on friendly messages.
At the same time, there is a simple and obvious way to make life better. Despite the obviousness, for some reason I never saw anyone use it - at least when I looked at other people's sources.
So, we have a problem - the message must “live” in different requests. We need a mechanism to transfer the text of the message to the page that should display it. You probably already remembered about the sessions.
Yes, in general you are right. Other methods, for example through a global variable, do not allow saving data in the case when a redirect is used (note by Maxim Naumenko). Plus, I usually make sure that each screen in the application has the ability, along with other information, to display messages that were generated on previous screens. This is convenient because there is no need to prepare separate screens for displaying messages, and the user does not have to click the mouse again. But, really, the designer needs to think here - to highlight the area in which messages would appear.
The idea is very simple and can be implemented with a couple of classes.
The first thing that comes to mind is to create a Message class, which would, in fact, represent a message in our simple class diagram. The message must be able to save itself in the session, as well as display itself on the screen.
class Message ( /** * Message content. */ var $content; /** * Constructor for initializing the message text. * * @param content message content */ function Message($content) ( $this->content = $content ; ) /** * Write a message to the session. */ function send() ( $_SESSION["session_messages"] = $this->content; ) /** * Output a message to the page. */ function toPage() ( echo " - " . $this->content . "
";
}
}
The $_SESSION variable is used to access the session.
Note that $_SESSION is an array, we are using just one element of this array with the index ‘session_message’.
In this case, we are dealing with an “array of arrays” - what we store in the ‘session_message’ element is an array, this is the list of transmitted messages (of course, there can be several of them).
If you couldn't find the thread, it's time to brush up on the sections of the manual dedicated to sessions and arrays.
You may have a question. Why are classes needed here? It would be possible to get by with two functions. But let's look further. We may need to create messages with different types (info, error, warning), and determine message recipients.
Please note that at the moment it is not the object itself that is put into the session, but only the message text. OOP allows us to later change the behavior of the send() method without changing the client code that accesses this method (for example, in the future we can write the entire Message object to the session if it has many fields).
Let's imagine that we would do this using functions. We would probably have a message_send($txt) function, and also a message_to_page($txt) function. Now we need to add the ability to have different behavior for different types of messages. Function calls change: message_send($txt, $kind), message_to_page($txt, $kind). You will have to comb through the entire application code in search of such functions, making corrections.
This can be avoided by anticipating the situation in advance by presenting the message as an associative array: $msg[‘txt’], $msg[‘kind’], then there will be only one parameter in function calls. Can you feel how this is trying to become a class?
So, OOP gives you the opportunity to have the luxury of not thinking through everything in advance.
The next class - Inbox - is designed just for this.
class Inbox ( /** * Array of received messages. */ var $messages = array(); /** * In the constructor, we get all received messages * and delete them from the session. */ function Inbox() ( if (is_array($ _SESSION["session_messages"])) ( $messages = $_SESSION["session_messages"]; $co = sizeof($messages); for ($i = 0; $i< $co; $i++)
{
$this->messages = new Message($messages[$i]); ) ) /* clear the messages array */ $_SESSION["session_messages"] = array(); ) /** * Display the contents of the Inbox on the page. */ function toPage() ( $co = sizeof($this->messages); if ($co > 0) ( echo "Message from the system:
"; ) for ($i = 0; $i< $co; $i++)
{
$this->messages[$i]->ToPage(); ) ) )
Let's try out our messaging system.
Let's create a very simple example that will respond to a form submission by reporting the number of seconds in the current minute.
We hid all the work with arrays and sessions inside classes, and the final code looks simple and beautiful.
Create a directory on your web server, then create these three files in it and try the script out. Please note that there are no problems with the Back and Refresh buttons.
Now imagine that you are creating a complex portal, where, as a rule, there are several blocks on the pages, and each one can contain a separate application.
Here we encounter two difficulties:
* I would like the list of messages to appear in a specific part of the page, and you have already found a good place for this.
The problem is that you need to run the $inbox->toPage() command at exactly the moment that would correspond to the position of the list of messages on the page. If we want to change the position of this list, we will have to go into the code, but it is not good to constantly change the portal frame for this. The best solution would be to make the output of messages in the form of a separate module, which we only know that it needs to be connected to the framework.
That is, free yourself from the strict sequence of launching modules. Indeed, since the result of the Inbox output does not depend on the operation of the system (at this step we already have all the data in the session), then why the extra complexity?
* To maintain the appearance (design) of the message list, you need to take care of the HTML code, which is hardcoded in the toPage() methods of the Message and Inbox classes. Typically, you will have to change the PHP code in order to change the design.
To try to solve the first problem, you can create a buffer that stores the result of the Inbox output.
Perhaps we will still have several similar (to Inbox) things, and we need to create a buffer system. In order not to confuse whose output is whose, we will probably come to naming the buffers. We will store somewhere the sequence in accordance with which the buffers should be output - preferably in an external file to make changes easier.
This attempt at a solution already gives us the idea of using XML as a means of storing intermediate data. And using XSLT styles will help solve the second problem.
I will not dwell on what XML is and what XSLT is. If you're not familiar with these things, zvon.org is a good place to start looking.
The idea is to generate not HTML code, but an XML structure in the toPage() methods. The page document will be created as a string with XML code (it will serve as a “buffer”), and at the last stage of the script we will use an XSL transformation.
First, let's imagine what should be the result of the main part of the code.
minute 57 second: 45
What it is is quite easy to guess - two messages and a form. Please note that the PHP script only needs to prepare such a string - it is very simple. Moreover, the order of the main tags is not important - you can put them at the beginning, for example, as will be convenient for the programmer. How to implement it. You can, without changing anything, use output buffering, output XML instead of HTML code, and at the end simply capture the output into a string. But then we will lose flexibility - for example, sometimes you want to output debugging information directly to the page (using echo). At the same time, PHP developers are working on a DOM module that offers a more advanced way of creating and passing tree documents. If we want to implement the DOM, we will have to redesign the entire application, changing the output of strings to the creation of DOM elements. Therefore, I prefer to store the XML representation of objects within the objects themselves, sequentially assembling a common XML document. It's not that difficult, it just needs a little modification. You will see that this technique is not strictly tied to a specific way of storing XML data, and this will allow you to make the transition to using the DOM with little effort. First of all, notice that each of our objects has a toPage() method. This similarity should make us think about introducing a new common parent class. Let each class that can create pieces of an XML document for a page inherit from a class that will take care of the XML representation of the object. Let's call it Outputable.
class Outputable ( /** * XML container (string). */ var $output = ""; /** * Give the contents of the container and clear the container. * * @return a string with XML data */ function getOutput() ( $ out = $this->output; $this->output = ""; return $out; ) /** * Add a portion to the contents of the container. * * @param string the string to add */ function appendOutput($string) ( $this ->output .= $string . "n"; ) /** * "Abstract" method. */ function toPage() ( ) )
The toPage() method is made empty - in this case it is needed as an indicator of how external “matryoshka” classes should communicate with the inner class. However, we could offer a default implementation here if we noticed that there are many objects that display themselves on the page in the same way.
The Message and Inbox classes will change slightly - they should now both inherit from Outputable, and the toPage() methods will also change
Message.php
class Message extends Outputable ( /** * Message content. */ var $content; /** * Constructor for initializing the message text. * * @param content message content */ function Message($content) ( $this->content = $content; ) /** * Write a message to the session. */ function send() ( $_SESSION["session_messages"] = $this->content; ) /** * Output a message to the page. */ function toPage() ( $this->appendOutput("".$this->content.""); ) )
class Inbox extends Outputable ( /** * Array of received messages. */ var $messages = array(); /** * In the constructor, we receive all received messages * and remove them from the session. */ function Inbox() ( if (is_array ($_SESSION["session_messages"])) ( $messages = $_SESSION["session_messages"]; $co = sizeof($messages); for ($i = 0; $i< $co; $i++) { $this->messages = new Message($messages[$i]); ) ) /* clear the messages array */ $_SESSION["session_messages"] = array(); ) /** * Display the contents of the Inbox on the page. */ function toPage() ( $co = sizeof($this->messages); $this->appendOutput(""); for ($i = 0; $i< $co; $i++) { $this->messages[$i]->toPage(); $this->appendOutput($this->messages[$i]->getOutput()); ) $this->appendOutput(""); ) )
The output method has changed - now, instead of directly outputting to the page, the external representation is for the time being stored in Outputable, which “sits” in each of the objects. The appendOutput() method serves as a replacement for the echo() construct. To get the output of an object, the getOutput() method is used.
Now let's see what the client part of the code is, which will solve the same problem as before.
index.php
The main innovation is in the $global_content object, the name of which speaks for itself. In this case, it belongs to the Outputable class; in real-life tasks, you would probably create a separate class for the page content.
If you look closely, the content of the script has practically not changed - the same inbox, the same toPage(). Added an instruction that displays the contents of the message list in the page content. For variety, two messages are now generated.
In order to look at the result, all that remains is to prepare the XSL template.
style.xsl
XSLT Example
What have we achieved?
First of all, you can more confidently take on complex projects - real independence of modules is ensured. The order in which results are placed on the page is now controlled using an external XSL template and does not depend on the order in which the modules are run.
Any module that generates XML data as a result of its work can be used in a project. By the way, this is one of the advantages over template engines, in which data creation consists of a sequence of calling methods (assign, etc.) of a specific engine, for which there is no common standard.
Another advantage is ease of debugging. If you run the script, you will notice that each page contains debug output - an XML prototype that greatly simplifies debugging applications.
Something else you need to think about is how to create message objects. It is not always convenient to use new directly in client code. But perhaps this is a topic for a separate article.
Finally, a gallop about the prospects:
* pop-up windows for a list of important messages
* "sender pages" and "destination pages" in messages
* logging messages in the database
* button "show history of my actions"
* statistical analysis of user actions within sessions
* "intelligent assistants" in web applications
In KP and BUS, starting from version 11.5, in editions that include a social network, a new module “Web messenger” has appeared.
Before being released to everyone, the module underwent a baptism of fire on our “Social Intranet”, collecting as many as 8 updates

In six months of development, we've done a lot
We completely abandoned the previous interface and created a new one, based on the experience of popular instant messengers.
The dialogue window began to open within the page, faces appeared in it, messages were color coded, and it became possible to easily carry on a conversation with several people at the same time.
The history window is a separate topic, everyone has long wanted to have a history search, now we finally have it, we are planning to add a calendar there for quick navigation.
We created a notification center with different types of messages, provided the ability to view the history of their receipt, and for developers a simple API for adding and recalling notifications.
And all this is available on every page of your site!
Unfortunately, not everything that was planned was implemented
First What we didn't have time to do was translate the messages into our tables.
Such a transition would make it possible to abandon the “social network” module, which would give greater freedom in the choice of editors, and it would also be possible to introduce group chats.
Second, this is the implementation of true "instant" communication. Now the module uses regular pooling, polling the server once every n-seconds, the polling period varies depending on the activity of communication.
We plan to write a separate service that will maintain constant connections and send out data updates as needed (for the messenger, for the live feed, etc.).
Third, we plan to slightly change the interface, abandon the separate contact list and dialog window, and combine them into a single whole, which in the future will allow us to move the messenger into a mobile application.
There is no documentation yet and it will not appear until the fall, because... The module is actively being developed and we want to leave the ability to change the API.
However, I will try to publish examples of working with that part of the API on which work has already been completed and you can safely use them in your modules.
Working with notifications (relevant for IM starting from version 11.5.2)
We have implemented three types of notifications:
- personalized notification;
- notification from the system;
- notification requiring confirmation;
Before using the API, you need to check whether the module is installed on the system:
| if (IsModuleInstalled("im") && CModule::IncludeModule("im")) ( ) ?> |
Personalized notification 
If messages are set to NOTIFY_TAG, then the user will group them. 
Notification from the system 
| $arMessageFields = array(// recipient "TO_USER_ID" => $USER->GetId(), // sender (can be >0) "FROM_USER_ID" => 0, // notification type "NOTIFY_TYPE" => IM_NOTIFY_SYSTEM, // module that requested sending a notification "NOTIFY_MODULE" => "im", // symbolic tag for grouping (only one message will be displayed), if this is not required, do not set the parameter "NOTIFY_TAG" => "IM_CONFIG_NOTICE", // notification text on the site (html and BB codes available) "NOTIFY_MESSAGE" => "[b]Attention: you must check and specify the correct path to the social network in the settings of the “Instant Messaging and Notifications” module", // notification text to be sent by email (or XMPP ), if there are no differences, do not set the parameter //"NOTIFY_MESSAGE_OUT" => ""); CIMNotify::Add($arMessageFields); ?> |
Notification requiring confirmation (confirm) 
| $arMessageFields = array(// recipient "TO_USER_ID" => $USER->GetId(), // sender "FROM_USER_ID" => 2, // notification type "NOTIFY_TYPE" => IM_NOTIFY_CONFIRM, // module that requested sending the notification "NOTIFY_MODULE " => "calendar", // symbolic tag for grouping (only one message will be displayed), if this is not required, do not set the parameter "NOTIFY_TAG" => "CALENDAR|INVITE|123|".$USER->GetId() , // notification text on the site (html and BB codes available) "NOTIFY_MESSAGE" => "I invite you to take part in the meeting “Instant Messaging and Notifications” which will take place on March 15, 2012 at 14:00", // notification text to send by email (or XMPP), if there are no differences, do not set the parameter “NOTIFY_MESSAGE_OUT” => “User Evgeny Shelenkov invites you to take part in the meeting “Instant messages and notifications” #BR# which will take place on 03/15/2012 at 14:00.#BR # #BR# Accept: http://test.ru/calend.php?CONFIRM=Y&CID=123 #BR# Refuse: http://test.ru/calend.php?CONFIRM=N&CID=123", // array describing the notification buttons "NOTIFY_BUTTONS" => Array(// 1. button name, 2. value, 3. button template, 4. transition to the address after pressing (optional parameter) Array("TITLE" => "Accept", " VALUE" => "Y", "TYPE" => "accept" /*, "URL" => "http://test.ru/?confirm=Y" */), Array("TITLE" => " Refuse", "VALUE" => "N", "TYPE" => "cancel" /*, "URL" => "http://test.ru/?confirm=N" */),), // symbolic code of the letter sending template, if not specified, it is sent with the notification template "NOTIFY_EMAIL_TEMPLATE" => "CALENDAR_INVITATION"); CIMNotify::Add($arMessageFields); ?> |
To work with this type of notification, it is not enough to simply send a message; you also need to serve it.
Service
There are two options, the simplest one is following the link (if you set the 4th parameter in NOTIFY_BUTTONS).
After following the link, you need to call the following code in your code:
Attention: pay close attention to the name of the tags; when you call deletion, all messages with that tag will be deleted.
When sending multiple messages, this must be taken into account so that the execution of an action by one user does not accidentally delete the notification to everyone (except for places where such logic is needed).
The second option is at events.
1. you need to register the dependency
Don't forget inside your functions ConfirmRequest And RejectRequest cause notification to be deleted CIMNotify::DeleteByTag()
That's all for now, I'm waiting for your suggestions in the comments, successful implementations!
If you want to try the API before the release of 11.5.2 in an array with parameters, you must additionally specify "MESSAGE_TYPE" => IM_MESSAGE_SYSTEM, also the option with a link in buttons will not work for confirm notifications. But it’s better to wait; update 11.5.2 is due out on May 23.
Better a bad streak than delirium tremens...
PHP AJAX CRUD: creating, deleting, editing records in the MySQL databaseIn this article, we will learn about how to add, edit and delete records in a MySQL database using PHP. We used a JQuery handler that sends an AJAX request to a server-side script. The handler updates the list of records.
AJAX form for sending requests for creation, deletion, editingWhen adding a record, the form sends data to the PHP script via an AJAX request. If the addition is successful, the list of entries is reloaded.
JQuery AJAX functions for CRUD database queryIn JQuery AJAX function we have switch cases add edit and delete. These cases generate different query and response data strings depending on the database actions.
function showEditBox(id) ( $("#frmAdd").hide(); var currentMessage = $("#message_" + id + " .message-content").html(); var editMarkUp = ""+currentMessage+" SaveCancel"; $("#message_" + id + " .message-content").html(editMarkUp); ) function cancelEdit(message,id) ( $("#message_" + id + " .message-content") .html(message); $("#frmAdd").show(); ) function callCrudAction(action,id) ( $("#loaderIcon").show(); var queryString; switch(action) ( case "add ": queryString = "action="+action+"&txtmessage="+ $("#txtmessage").val(); break; case "edit": queryString = "action="+action+"&message_id="+ id + " &txtmessage="+ $("#txtmessage_"+id).val(); break; case "delete": queryString = "action="+action+"&message_id="+ id; break; ) jQuery.ajax(( url: "crud_action.php", data:queryString, type: "POST", success:function(data)( switch(action) ( case "add": $("#comment-list-box").append(data); break; case "edit": $("#message_" + id + " .message-content").html(data); $("#frmAdd").show(); break; case "delete": $("#message_"+id).fadeOut(); break; ) $("#txtmessage").val(""); $("#loaderIcon").hide(); ), error:function ()() )); )
PHP script for CRUD operationsThe following code performs queries against the database. This PHP script, after performing a CRUD action, updates the records as a result of the AJAX response.
require_once("dbcontroller.php"); $db_handle = new DBController(); $action = $_POST["action"]; if(!empty($action)) ( switch($action) ( case "add": $result = mysql_query("INSERT INTO comment(message) VALUES("".$_POST["txtmessage"].")" ); if($result)($insert_id = mysql_insert_id(); echo " Edit Delete " . $_POST["txtmessage"] . " "; ) break; case "edit": $result = mysql_query("UPDATE comment set message = "".$_POST["txtmessage"]."" WHERE id=".$_POST["message_id"]); if($result) echo $_POST["txtmessage"]; break; case "delete": if (!empty($_POST["message_id"])) ( mysql_query("DELETE FROM comment WHERE id=".$_POST["message_id"]); ) break; ) )
At this point in this course, the foundation of our plugin has been laid out, a custom hook has been defined, and a persistent message has been attached to show how the hook works.
That we Not did, they did not implement the types of messages and their display according to the data entered by the user.
But before we begin, we need to add support for different message types, a class interface that will support each message type, and the data structure needed to store such messages.
Ready to get started?I'm looking forward to continuing the tutorial, but there are a few things we need to consider before diving headfirst into the source code. Make sure you have the following software installed on your system:
- PHP 5.6.25 and MySQL 5.6.28
- Apache or Nginx
- WordPress 4.6.1
- Your preferred IDE or editor
And if you're looking for an all-in-one solution, don't forget to try MAMP.
We have advanced toAs mentioned earlier, we are exactly in the middle of this course. If you missed any of the first lessons, here's what we've covered so far:
And this is what we will consider at the final stage of training:
Currently we have other tasks, and we will focus on them.
Let's get back to workSince we have turned to work (and as stated in previous lessons), we are committed to further implementation of the tasks in this part:
In this tutorial we will continue to develop our Settings Messenger by adding support for success and failure messages, as well as touching on security issues.In the previous article, we got started in Settings Messenger, but only to the point of setting up a feature that will continually display a success notification while the user page is loading.
In this tutorial we will add support for error, warning and success messages. Then we will display them on the screen to get an idea of how the messenger will work.
Additionally, we are going to make another change that will add support for dismissing notifications at the user's discretion.
This is the entire plan of the necessary work for this lesson. Let's start.
Settings Messenger extensionRemember, the whole point of Settings Messenger is to define our way of working with custom messages, custom hooks, and the native WordPress API for displaying messages in the context of the WordPress admin panel.
To do this, we're going to expand on the work done in the last lesson and start from here.
Successful messagesSince we started with successful messages in the previous lesson, let's continue with them. Now we have a hard-coded method that displays a single technique: