Installing oc open on a local openserver server. Installing Open Server. How do I create my own host configuration for a domain?
Hello everyone, today we will look at how to install and configure one of the popular local servers, Open Server. We will look at the basic capabilities of the local Open Server and test its operation. Open Server is a portable server platform and software environment created specifically for web developers. With the help of a local server, programmers can create their applications in server-side languages.
Download Open Server.
Here you go to the “download” page where you have 3 versions to choose from. These versions differ in the set of additional programs. I downloaded the largest version, there are many useful programs that will make your work easier (eyedropper, Sublime Text, a set of programs for working with a DBMS and much more).
Open Server is free. You can download any version of it for free, but you must understand that it is difficult to maintain and periodically update such a large project.
I realize this, so when I downloaded Open Server, I donated 100 rubles to them. This is not a lot, but if each of those who downloaded transfer 50-100 rubles, this will help the developers.
There are no torrents on the official website, so you will have to download through a browser.
After you have downloaded the installer, install the program itself. I installed Open Server on drive D, this is the drive with more space.
After installing the program, you will have a folder containing the following files:
In order to enable Open Server we click on one of the launch shortcuts. Depending on your system, you should choose the appropriate shortcut for yourself.
For example, I will create an index.php file in the folder. After creating a new project, update Open Server and launch the site through the My Sites tab.

Open Server is easy to learn and reliable to use. Everything here is made for people, you just need to practice.
In the future I will analyze Open Server. In other posts we will look at more advanced aspects of working with Open Server. You don't need it at this stage.
That's all!
If you have questions, write them in our group -
Every owner of a website or blog, sooner or later, has an irresistible desire to somehow “finish” or “tweak” it. Having read cheerful articles in the style of “Hatemeel - it’s even simpler”, they, without hesitation for a long time, begin to straighten the delicate code with the help of a sledgehammer, a chisel and some kind of mother. The result, most often, is pulling out the hair on the butt and panicked letters to technical support: “Help, my site is dead!”
Those who are smarter and more careful understand that before you climb into a living organism with unwashed paws, you need to practice on some kind of simulator. Professional website developers have been using them for a long time and successfully. For quite a long time, the most popular was Denver, a full-featured simulator of a remote server on your own computer. But for about three years now the project has not been resumed, the Internet has gone far ahead, and in modern computers and systems, old Denver is becoming crooked, or not at all.
The new favorite is the freely available OpenServer package. Type this word into Google and you will be taken to the project page, where you can download the source archive. Place it on a disk with at least 1 gigabyte of free space and unzip it. Go to the OpenServer folder and run the file with the same name.
First of all, you will be required to open Internet access. If you don't use Skype, then there shouldn't be any more problems. If you use it, first go to its settings and uncheck the “Use ports 80 and 443 as incoming alternative” checkbox. Then restart Skype. Check your Skype settings - they should look like this.
After the program starts, a red flag will appear on the command line. ![]() Click on it and you will see the server menu. Click on the green checkbox next to which it says “Start server”. The program itself will create a virtual disk W:. Congratulations, you have in your hands a full-fledged server with all the capabilities that real high-quality hosting provides.
Click on it and you will see the server menu. Click on the green checkbox next to which it says “Start server”. The program itself will create a virtual disk W:. Congratulations, you have in your hands a full-fledged server with all the capabilities that real high-quality hosting provides.
 What I will write next will probably cause indignation among professional webmasters. But I’ll take the risk of describing the easiest way to start your own experiments with code; we’ll leave more complex options for later. According to the rules, working with the site begins with creating a user and a database. Of course, if we are doing a real project, this is what we need to do. For us, experimenters with playful hands, OpenServer has already created a user with the name mysql, a database with the name mysql and the password mysql. All we have to do is create a new domain. To do this, click on the “Settings” menu and select the “Domains” tab. In the “Domain name” field, enter any name (it is not advisable to repeat the name of the real site), in the “Domain folder” field, write “localhost/www” and click on “Add”.
Further actions are standard. Load WordPress into the OpenServer\domains\localhost\www folder, open the wp-config file and enter the user and database names and passwords there.

We save, then in the browser we type the name that we entered as a new domain, and we get to the regular WordPress installation page. Here, be sure to write your email address correctly and do not allow indexing. After this, the new website is at your complete disposal. You can do whatever you want with it. For example, I test all new themes on it. It’s even better to install a working website theme on it and test plugins, widgets and scripts. You can remove unwanted links from the template code before installing it on your production site. You can use OpenServer as a testing ground for learning HTML, CSS and PHP. You can practice moving sites, come up with new pages, and so on and so forth. You can test your own themes and see them in any browser. And most importantly, there is absolutely no risk of ruining an already working site.
In fact, OpenServer is immeasurably richer in capabilities. There, in the menu, there is documentation where everything is described in detail. I just wanted to show a simple path to self-improvement and gaining practical work skills. After all, the one who doesn’t dream of becoming a webmaster is bad!
From the article you will learn: what OpenServer is needed for, where to download it from and how to install it (I will show using Windows 10 as an example)
Open Server allows you to use a local server on your computer. This means that you can work on your site on your home computer, and when the site is ready, transfer it ready and working to the Internet.
Click Download. On the loading page, select the Basic version. Enter the numeric code from the picture and click the Download button.

A page will open where you will be offered two options to download the program.
The first method is paid (Minimum donation amount is 60 rubles) - this method will ensure fast loading.
The second method is free and therefore very slow))

A file like this will be downloaded (on the day this article was written, it looked like this, but now it may look different). This is an archive with the program.

Double click on the file. A window will open asking you to select a location where to unpack the files from the archive. I chose drive D.
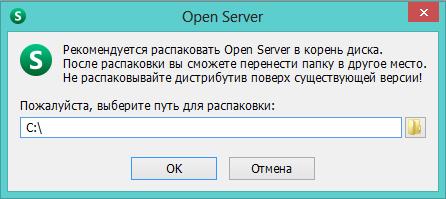
Click the OK button. The unzipping process will begin.

We go to the folder that we selected in step 3. We see that the OpenServer folder has appeared. We enter it.

We see two shortcuts for launching the program (there can be only one shortcut, it depends on the bitness of Windows).
Double-click on the Open Server x64 shortcut.
Since this is the first launch of OpenServer, the process of installing components (MicrosoftVC++) for the correct operation of the program will begin.
After installation is complete, the program will prompt you to restart your computer. Reboot.
We go through the fourth step again - that is, we go to the OpenServer folder and launch the program.
In the tray (the area in the lower right corner where the clock is) we see a new icon - a red flag.
Click on it and the program menu will open. Click on the green checkbox that says Run.

We're waiting a little. The red flag will change to yellow, and then change color to green. The server is running.

If the open server does not start - a window appears with the words “Startup failed!”, then go down to the bottom of the article to the description of the open server settings.
Checking OpenSever operation
Click on the green flag. In the menu that opens, point the arrow to My Sites. A submenu will appear with the only item localhost. Click on it.

A page will open in the browser with a message that OpenServer is running.
Hooray! We made it))

As you can see, installing openserver is not at all difficult. I like this local server more than Denver, so I use it in my projects and recommend it to you.
Now it needs to be configured.
Open server setup
Click on the checkbox. → In the menu that opens, click on Settings.

In the window that opens, on the Basic tab, check the box next to Run with Windows. I left the delay as suggested at 20 seconds. The delay is needed so as not to slow down the loading of Windows. First, all the components necessary for the computer to operate will be loaded, and then the Open Server will start.
Also check the box Require an administrator account. Some functions only work with administrator rights, so be sure to check this box.

I would like to introduce you to a new professional tool for web development for Windows.
Open Server is a portable local WAMP/WNMP server that has a multifunctional control program and a large selection of plug-in components. The presented software package is not just another amateur assembly put together on the knee; it is the first full-fledged professional tool created specifically for web developers, taking into account their recommendations and wishes.
If you are still using Denwer, Xampp, Vertrigo, etc. or you prefer to install all server components separately - welcome under cat.
Components and Tools
To debug scripts in different environments, Open Server offers a choice of two types of HTTP servers, different versions of PHP and DBMS modules, as well as the ability to quickly switch between them.HTTP modules: Apache 2.2.21 and Nginx 1.0.11;
DBMS modules: MySQL 5.1.61, MySQL 5.5.20 and PostgreSQL 9.1.1;
PHP modules: PHP 5.2.17 (IMagick 2.2.1, Zend Optimizer 3.3.3, IonCube Loader 4.0.7, Memcache 2.2.4) and PHP 5.3.9 (IMagick 2.3.0, Xdebug 2.1.3, IonCube Loader 4.0.10, Memcache 2.2.6);
Excellent set of tools: HeidiSQL, Adminer, PHPMyAdmin, PHPPgAdmin, PgAdmin.
The package also includes such goodies as: Perl, FTP server, Sendmail, Memcached server!
Open Server is the only project I know of that includes Nginx! Moreover, here a convenient connection of rewrite rules is implemented through .nxaccess files in the domain root, and PHP works in True FastCGI mode (indestructible).
All components are taken from official repositories and are always updated to the latest versions with each package update.
Possibilities
First of all, I want to note that Open Server is a completely portable server. No system services, heaps of garbage in the registry and system32. You can carry it with you everywhere on a flash drive (preferably a high-speed one), run it on your work/home machine without fear that something won’t work for you.If the necessary system components are not on the computer, Open Server will install them itself; just select [Tools - First launch] in the menu if the server is launched on the computer for the first time.
I don’t want to describe the main features of the program, since for the most part they are standard for this kind of software. It goes without saying that with the help of Open Server you can start/stop the server or open the desired domain. It will be much more interesting for you to learn about the specific “features” that make Open Server special, truly special:
Detailed viewing of logs of all components in real time;
- choice of HTTP, DBMS and PHP modules in any combination;
- support for SSL and Cyrillic domains out of the box;
- support for aliases or other domain pointers, as well as a convenient form of setting them up (hello to fans of multisite in Drupal!);
- creating a local subdomain without losing visibility of the main domain on the Internet;
- access to domains (in one click) and quick access to module configuration templates;
- multilingual interface (Russian, Ukrainian, Belarusian, English);
The program is constantly being improved, all relevant requests from Open Server users are studied in detail and most of them are implemented!
A little history
Initially, I developed a control program in the DevelStudio environment. I think there will be those who read my story about this development environment. Since then, a lot of water has passed under the bridge, I realized that work on this project is being carried out extremely sluggishly, there were no prospects in terms of developing the functionality of Open Server. I rewrote the program from scratch and from version 4.0 onwards development is carried out in Delphi.Conclusion
For many years I used Denwer in my daily work, after some time I switched to Vertrigo. I tried almost all other available options: XAMPP, AppServ, WAMPserver, TopServer, etc., but none of the above builds satisfied me. Limited functionality, difficulty in setting up, and sometimes simple external ugliness discouraged me from using these “creations.”Dear Khabravians, I will be glad to see you at the Open Server forum, I will listen with interest to your suggestions for the development of the project, wishes for connecting new components and other interesting ideas.
2. Project files.
I'll name the domain "myshop" (You can choose your own name if you wish). Unpack the downloaded archive with the project into the folder C:\OpenServer\domains\myshop\

It should look like this: (pay attention to the folder path)

3. Add a local domain to Open Server.
Go to settings:

Then go to the "Domains" tab. In the drop-down list, select the “Manual control” menu item:


The program will require a server restart, confirm:

4. Let's check the operation of the site.
Hooray! The site works, although it shows an error. The error text states that the site cannot connect to the database. Now we will configure it.

5. Setting up the database.
At the beginning of the lesson, we downloaded the db_export.zip archive. Unpack it. The db_export.sql file is a "copy" of the database, keep it handy.
The phpMyAdmin tool is included with Open Server. Let's use it to work with the database:

Login to the panel with the login "root", leave the password blank

Go to the Import tab, Choose File, select the db_export.sql file, and click Open.

In a moment, the database will be imported, you can view the contents of its tables:

6. Configuring database connection parameters.
The last step is to configure the settings. To do this, we need to edit the db_params.php file in our project. To do this, open it using notepad:

And enter the required data. We leave the database name unchanged - “phpshop”. In our case (with a standard Open Server installation), the user is “root” and the password is an empty string.


