Connecting and setting up the ZyXEL Keenetic router model Lite II. New generation of ZyXEL routers. Review of Keenetic II, Keenetic II Giga and Keenetic Ultra Blocking Wifi network users by MAC address
In this article we will configure an excellent, inexpensive ZyXEL Keenetic Start router. You can take a closer look at this device, read and leave your review about it at , which is entirely dedicated to this model. There I also described my impressions of this router and indicated the main characteristics.
ZyXEL Keenetic Start is an excellent router for the home that can easily handle connecting your computers, phones, tablets and other devices to the Internet. Both via Wi-Fi and network cable. You can watch IPTV and organize a local network between your devices. Keenetic Start looks very nice. The device is definitely worth the money. I won’t describe all its pros and cons, you can see that at the link I gave above. And if I don’t forget, I’ll do a short review of this router later.
In the meantime, ZyXEL Keenetic Start is standing on the sidelines and waiting for me to start tormenting it, I’ll write more about the ease of setting up this router. Until recently, I thought that routers from Tp-Link had the simplest and most understandable settings panel, but it turns out that I was wrong. ZyXEL really took care of its users. We made a very simple and understandable control panel; all buttons and connectors on the device are also labeled in clear language. So, setting up ZyXEL Keenetic Start should not cause any difficulties. And according to these detailed instructions, you will set up your router in a few minutes.
As usual, we will divide the article into several sections:
- Connecting the ZyXEL Keenetic Start router and setting up the Internet (WAN)
- Setting up PPPoE, L2TP and Static IP
- Setting up a Wi-Fi network, setting a password
Connecting and setting up the Internet on ZyXEL Keenetic Start
I recommend setting up by connecting the router via a network cable to a computer or laptop. If it is not possible to connect via cable, then in principle you can establish a connection via Wi-Fi. First of all, we need to connect the router to the device through which we will configure it. There is one point here: if your provider binds by MAC address ( you can call support and ask), then it is best to configure from the computer to which the Internet is connected.
Factory reset
If you have already tried to configure the router, or it has been configured before, then I advise you to reset the settings to factory settings. So that in the settings there are no parameters left from the old provider, etc. Resetting the settings on ZyXEL is very simple.
Take something sharp, a needle, or a paper clip. Then, press and hold the button for 10 seconds Reset on the back of the router.
All indicators should go out and light up again. We can continue.
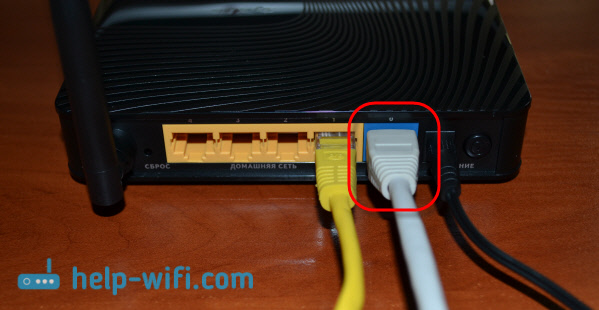
We take the network cable that comes with the ZyXEL Keenetic Start and connect it to a computer or laptop. On the router we connect to one of the yellow connectors that are labeled "Home network", and on the computer to the network card. Like this 
Plug your router into a power outlet (if you haven't turned it on yet). It may be that the power is still turned off with the button on the back of the router, check. On the front panel, there are indicators by which you can monitor the operation of the router. The modes of these indicators are very well described in the instructions for the device. And in general, the instructions for the routers of this company are very good and clear. That's it, you can leave the router for now.
Login to settings
On the computer from which we will configure, open any browser. In the line where you write the website address, write the address for accessing the ZyXEL Keenetic Start settings and press Enter. It's either 192.168.1.1 , or my.keenetic.net. Which one do you like best?
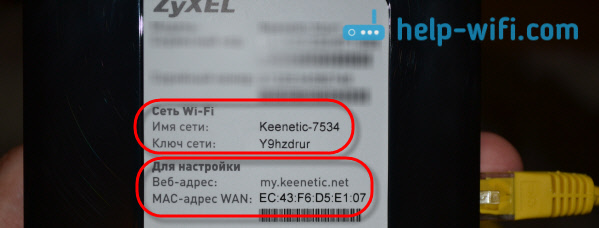
Please note that the router's web address, the standard name of the Wi-Fi network, the password for this network and the MAC address are indicated on the label on the bottom of the router.
This information will definitely come in handy.
The router settings should open. You can see detailed . The article was written using this model as an example. This article also describes how to connect to the Wi-Fi network of a new router.
The main thing we need to know to configure the router is what type of connection your ISP uses: Dynamic IP (for example, Kyivstar), Static IP, PPPoE (Rostelecom, TTK, Dom.ru), L2TP (Beeline). It’s very easy to find out: call the provider and ask, go to their website and look there, or just find it on the Internet. You also need to find out whether the provider binds to the MAC address of the device. Very often, Dynamic IP connection technology is used, and it is very easy to configure. Above I wrote what technology popular providers use. There is also a detailed article on this topic:.
If your provider uses Static IP, PPPoE, or L2TP technology, then you must have data (IP address (optional), login, password) that will need to be specified during the setup process.
After updating the firmware to version v2.04(AAKV.1)C6 and newer (you may already have this version), with the help of a special wizard you can set up a connection with your provider much easier. There you can already select the country, region (city), provider and set the necessary parameters. If you have a button in the control panel, then press it and proceed to the step-by-step setup. If not, then you need to update the firmware.
Setting up a connection using Dynamic IP technology
This means that the cable from the provider is connected to the router, we went into the settings and select the item. If there is no “quick setup” item, then you need to reset the settings. I wrote above how to do this.

Since the router automatically connects to the Internet using Dynamic IP technology, it will immediately prompt you to update the firmware if there is a new one. Click on the button "Update".

We wait for the router to download the firmware itself, install it and reboot. When you see a message that the component update is complete, click "Further". In the next window, the router will prompt you to enable the function "Internet filter Yandex.DNS". If you enable this function, the router will block access to sites that Yandex considers malicious. You can disable or enable this feature in the settings at any time. Click Further.

We see a message that the router is configured and the connection to the Internet is established. You can press the button Web Configurator and go to Wi-Fi network settings, etc. I will write about this in this article below.

The Internet should already be working. You can connect your devices to the router. If you do not want to change the Wi-Fi network name and password, you can use the standard connection information, which is indicated at the bottom of the router.
Connection setup: Static IP, PPPoE, L2TP (Beeline)
Things are a little different here. In the router settings you also need to select .
The router will think and try to connect to the Internet, but it will not work, since for these types of connections, you need to set the necessary parameters. To begin with, it will offer to configure the MAC address. You need to know if your ISP does tethering. If not, then leave the item "My ISP does not register MAC addresses" and click next. If the provider does the binding, and you have the binding configured on the computer from which you are configuring, then select "This computer's MAC address". In other cases, you need to call the provider's support and ask him to bind the MAC address of the router (which is indicated at the bottom of the device, or in the same window).


In the next window, you need to specify your username and password (which your provider should give you) to access the Internet. If you have PPPoE or L2TP technology, then this data must be present. If you just have a Static IP, then check the box that says you don’t have a login and password.

The router must establish a connection with the provider. If nothing works, then go to the Web Configurator, to the tab "Internet", then select PPPoE/VPN, then press the button "Add connection" and fill in all the required fields. We select the desired type of connection, set the login, password and other parameters that your provider must provide. For example, setting up Beeline Internet:

You can edit created connections, delete them, and create new ones.
Setting up a Wi-Fi network and setting a password on Keenetic Start
If the Internet is already working through the router, then all that remains is to configure the wireless network. You don't have to do this. Your Wi-Fi network will have a standard name, and to connect to it you can use the password, which is indicated along with the name on the bottom side of the router. But, you can change the network name and password. It's not difficult to do this. You can also set up IPTV (if your provider provides such a service), configure LAN, or . It is not necessary to make all these settings. To use the Internet, you just need to configure ZyXEL Keenetic Start to work with your provider, which is what we did above in the article.
You can set up a Wi-Fi network on the tab "Wi-Fi network". I recommend setting only a new network name and password. The password must be at least 8 characters. Create a password and be sure to write it down. If you have forgotten the password for your network and want to remember it, or want to change it, you can do this in detail. You can leave the rest of the settings as they are in the screenshot below. Don't forget to click on the button "Apply" to save the settings.

If in the same window you go to the tab "Guest Network", then you can launch another wireless network for your guests, or for clients in the office. The main feature is that everyone who connects to the guest network will not have access to the local network.
And also, in the settings you can. I think you will find it useful.
Afterword
Setting up any ZyXEL router should not cause any problems. The control panel is not complicated. True, WAN setup (connections with provider) they did something interesting. But, after updating the firmware, the NetFriend quick setup wizard appeared, with which it is very easy to configure the router to work with the provider.
If you have any questions about setting up ZyXEL Keenetic Start, you can leave them in the comments to this article. Best wishes!
Routers of the famous Zyxel brand have long proven their worth and have earned the highest rating from users according to the “price-quality” criterion. They cost less than branded products of this kind, but are in no way inferior in quality.
As for the Lite II model, it has undergone a number of changes and improvements compared to previous versions: the router’s performance, operational stability, connection speed have significantly increased, and the appearance has changed.
But what really sets the Zyxel Keenetic Lite II apart is its ease of use. Even without having the necessary skills, it is possible to prepare and configure a wifi router for work in the shortest possible time.
Changes in the new model “Zukhel Kinetic Light”, as some users call it, affected not only the appearance, but also the “filling”. The device is now equipped with an updated MIPS(R) 24KEc 580 MHz MediaTek MT7620N processor, which has become a real breakthrough due to its increased power. The two Keenetic models are distinguished by a noticeably increased amount of RAM, which has doubled in size: DDR SD RAM 64 Mb. In the same way, the reception and transmission speed increased from 150 Mbit/s in the first Lite to 300 Mbit/s in Lite II. The manufacturer paid close attention to security: Keenetic introduced a firewall that protects gadgets connected to the network via a router from aggressive hacker attacks. The new Lite II is capable of connecting 3-5 devices, while it does not “cut” the speed and does not have connection interruptions. All these changes in the new Keenetic model have a beneficial effect on the overall functionality; Lite II rarely overheats and does not need constant reboots.
Appearance Lite II
 Continuing the description of Lite II, we will highlight several important points regarding changes in its appearance. The transition from snow-white, like the first version of Keenetic, to black, as well as the use of a new design, attracts attention. The Lite II router model has become smaller in size, more compact and refined, which is facilitated by the ribbed top of the case. Keenetic was equipped with an additional external Wi-Fi antenna installed on the rear panel. There are also five 100 Mbit ports: four LAN connectors for a home network, one WAN connector for a local one. On the top panel of Lite II, a button has appeared that regulates the connection to Wi-Fi networks, which has two main modes:
- A quick press starts an instant connection.
- When pressed with a delay, the home network is turned on or off.
Connecting and preparing for work Keenetic
 Connecting the Lite II router and subsequent preparation for operation is quite simple; for this you need:
- Using the adapter that comes with the Lite II router, connect it to the electrical network and press the “Power” button.
- Connect the provider cable to the connector marked “Internet”, highlighted in blue. On Keenetic the indicator with the value “0” will light up.
- Connect the patch cord included in the kit with one plug to the Keenetic LFN connector, preferably No. 1, and the other to the PC network card, the “1” indicator will light up.
- If everything is done correctly, the power light and indicator that looks like a ball with a mesh will light up on the front panel of the Lite II.
If the “0” indicator does not light up when connecting the cable from the provider, this means that the wire may be damaged. If the indicator with the number of the connector to which the patch cord is connected does not light up, this is a sign of a malfunction of the computer’s network card, or something was done incorrectly when connecting. And if all the indicators are on, it means the connection was successful, the Keenetic router is in working order and now you can proceed to the device settings.
Keenetic settings
Most users do not know how to set up a new Zyxel Keenetic Lite 2 router, but in fact it is as easy as shelling pears. Many people are concerned about the “inadequate” operation of the device, as they believe, when connected, but most often this happens due to damage to the PC’s network card, and not due to a malfunction of the Keenetic router. In such cases, it is necessary to test the card for functionality, and then proceed with the settings. With Lite II everything happens the same as with any other router:

You can change the parameters and configure the second Keenetic “Zixel” in a simpler way. To do this, you just need to go to the web interface of the Lite II router and use the prompts. The next step is to configure and connect to the Internet.
Automatic setup
As with any other router, automatic configuration is the best option for Keenetic lite II. But don’t think that pressing a button solves all problems. To start autotuning, proceed as follows:

After this, the automatic setup of Keenetic will begin; upon completion, a yellow triangle with an exclamation mark will appear on the tray, in the “Network” icon, indicating that the setup and connection were successful. To check the status, you need to repeat all the steps from the very beginning; in the “Local Area Network Connections” on the “Status” tab you will see a nine-digit IP address and password marked with four dots.
Connecting to the Internet manually using the example of some providers
After configuring the parameters of the Lite II router, go to the Internet connection settings. Here everything is a little more complicated, but every user can do it independently. First of all, you need to connect the cable of your Internet service provider to the Lite II, perform the following procedure:

That's all, the local network is configured and connected, and Keenetic is ready to work.
"Home ru"
This Internet service provider uses the PPPoE protocol to connect Lite II, the most common among providers, including in the CIS. Although there are some exceptions regarding the Trans-Urals and the Far Eastern region, where instead of the universally accepted standard, Dom.ru connects via dynamic IP addresses. Actions are performed at several stages of connection:

Once all steps are completed, connect the ISP cable to the Lite II WAN port for the local network.
Rostelecom
Rostelecom, like Dom.ru, uses the PPPoE protocol for connection. To authorize this provider, you will need to repeat the same algorithm of actions as described above. Here, a dynamic IP address is used in the same way as a connection type used in some regions, in particular in the east of the country: Udmurtia, Chuvashia. Immediately before connecting the Lite II to the Internet, it is better to check with the technical support section of the provider which protocol should be connected.
"Beeline"
This company, unlike previous ones, uses an L2TP connection type. Despite the apparent promise, the connection is not as developed and popular in the CIS countries as, for example, PPPoE. The connection of this provider via the L2TP protocol has a number of tangible differences from the connection of Dom.ru and Rostelecom. But this process on Lite II occurs in the same way as on other routers. What makes it similar to other providers is the sequence of actions:

After completing the procedure, it is advisable to reboot Keenetic and then start the router again.
NetByNet
To connect to Keenetic, this Internet service provider uses the PPTP protocol, which is widely used except in Russia, but even here it is significantly inferior in popularity to previous providers. It is not particularly different from the other two in terms of functionality and connection settings, but there are differences, albeit minor ones. This mainly concerns the use of a VPN server, which is alien to others, but in some cases offers a number of advantages over them. The sequence of actions when connecting NetByNet on the Lite II router is as follows:

To configure PPTP/VPN using an automatic local IP address:

After that, start using the services of the provider.
 In some cases, you have to use mobile devices to connect to the Internet of the Keenetic router, which is not such a bad option: in terms of speed, they are not much inferior to the speed of Wi-Fi. To connect a 3G/4G connection, you need to open the Lite II web interface and perform an operation that is not particularly complicated:
- In “Support for modems for 3G/4G networks” you immediately need to check whether this option is active.
- To do this, go to “System”, go to “Components”. If support is not active, you need to connect it on the official website.
- Open the web interface of the Keenetic router using the login and password: admin and 1234, respectively, if they did not change during the initial connection.
- In the settings, select “3G, 4G network configuration”.
- Check the line “Enable modem redundancy”.
- Enter the operator's data and name: number, authorization method, and saved user password for Keenetic.
- Click on the “Apply” button to save the changes and activate.
Finally, all that remains is to connect the modem to the Keenetic router using the USB cable that comes with the device.
 Connecting when creating a home network is perhaps the simplest of all the settings in Lite II, where you don't need to apply too many step-by-step steps:
- In the web interface of the Keenetic router, open the Wi-Fi section, from where go to “Access Point”.
- In the “Network name” indicate the personal data necessary for the connection.
- In “Using connection security”, select WPA-PSK + WPA2-PSK from the list.
- Enter the password used to log into the system in the “WPA Key”.
- Check the “Enable access point” checkbox.
- Click on the “Apply” button.
After that, all that remains is to check the Wi-Fi connection. The wireless link on the Lite II should connect almost immediately.
Configuration in repeater (repeater), amplifier, adapter or access point mode
 Similar actions are used in the case of limited Wi-Fi signal in large rooms, most often offices. To set up the Lite II in repeater mode, they often use another router, preferably the same model or brand, but this cannot be called an indispensable condition. The process itself is quite simple. To begin with, you just need to change the router’s operating mode to “Amplifier” using the switch located on the back panel of the device. Often, when using Keenetic series routers, this is not enough, then you need to apply the following sequence of actions in their settings:
- Open the “System” section in the Lite II web configurator settings, select “Mode”.
- Here, select “Amplifier - Wi-Fi zone extension” by checking the box.
- Click on the “Apply” button.
The Lite II router is switched to operate in repeater mode.
IPTV
Activation of this function usually occurs during the initial settings of connecting Keenetic to the network of an Internet service provider. But if for some reason this was not done before, you can set up an IPTV port at any convenient time, it’s quite simple:

After saving the changes in the Keenetic settings, you need to connect the cable to the TV set-top box.
IPv6 protocol
Setting up a connection via an IPv6 tunnel on the Lite II is not much different from similar ones. As in the case of the PPPoE, L2TP, PPTP protocols, for this you only need to check the availability of the connection with the provider. If access is granted, but connection does not occur, you need to apply the following algorithm of actions on the web interface of the Keenetic router to configure (CLI) the Internet center:
By applying these steps, the provider will provide an IPv6 address and DNS server address.
Individual user connection settings
Often users configure their router " Zuxel Kinetic Light 2" and on an individual basis, and not according to certain standards. The first step is to connect the Keenetic router to the local network using an Internet service provider cable and log into the Lite II web interface. Many people advise opening it on Internet Explorer 11 or any other version, but not older than the seventh. Next, configure the Internet center connection using the web configurator for this purpose, connecting via any convenient protocol: PPPoE, PPTP, L2TP. This happens in the same way as for connecting Dom.ru, Beeline and NetByNet.
 This type of connection using DynDNS is used by most Internet service providers. To authorize their users, providers provide all the necessary data to log in and connect to DNS servers. If the dynamic names needed to connect to public servers are unknown, they can be found on the company’s official website. After this, the IP parameters are set independently, using manual or automatic mode in Keenetic:
- Open the Lite II web configurator.
- In “Home Network” go to “IP Settings”.
- In “DHCP Server” enter the address of the public DNS server.
- Save the data by clicking on the “Apply” button.
But at the same time, connecting in manual mode has both positive and negative sides. On the one hand, a manual connection is more reliable than an automatic one, but on the other hand, there are a lot of inconveniences in terms of setting up a network on the Keenetic router.
Security Settings
Increasing network security is an important part of the Lite II router settings, which should be given maximum attention. To do this, you will first need to change the wifi password on the Keenetic router, if this was not done initially:
- Open lite II web configurator.
- Click on the icon displaying the signal level.
- In “Network name”, come up with any name for Wi-Fi.
- Apply the same actions in the “Network Key”.
Save the changes by clicking on the “Apply” button, reboot the Keenetic router, and then log in using the updated data. The next step is to set up a firewall that protects the Lite II and devices connected to it from unauthorized entry and hacker attacks:

Parental Controls on Lite II
This option is used to restrict access of minor children to the home network at a time chosen by the parents, when they are at work, for example, and cannot control the actions of their offspring. The “Parental Control” function in Keenetic does not allow any device marked in the system to connect to Wi-Fi networks, despite the fact that the Keenetic router itself is in access point mode. Like other settings in Lite II, this one is straightforward:

There are other ways to use parental control, more reliable than in the Keenetic settings, convenient and free, for example, the Yandex.DNS service, which has wide functionality.
Changing the function of the buttons
The functions of the Keenetic buttons configured on the router by default can be changed at your own discretion, as you like, using the system parameters of the Lite II web configurator:
- In the Keenetic main menu, enter the “System” and go to the “Buttons” section.
- Select from the list the most suitable option for their functionality.
- Save the changes by clicking on the “Apply” button.
Setting up the printer
In the Lite II model, connecting a printer, unlike other settings, is a completely thankless task. Although it supports this function, it does not always work, often intermittently. In a word, this is not the strongest side of all Keenetic routers, but theoretically there is not the slightest difficulty in the settings thanks to the following method:

After connecting, if the printer is working, its name is reflected in the “Control Panel” on the computer, in the “Printers and Faxes” section.
Setting up DLNA on the Lite II router
 Keenetic has direct access to the DLNA server, but the connection to it must be configured individually:
- In the router’s web configurator, go to “System”, and then to “Components”.
- Select the “DLNA server” checkbox and click the “Apply” button.
After waiting for the system updates to be applied, it is advisable to reboot the Lite II router.
Setting up a VPN server almost completely repeats the algorithm of actions used when setting up a DLNA server. You will need to tick the line with the name of the option in “Components”. If it does not appear in the list of available components, you need to go to “Updates”, where you highlight “VPN server” and click “Update”. When the server is installed, you should proceed to configure it in Keenetic:

Setting up a torrent client on the Lite II router
In Keenetic II you can easily configure this option; this is done in the same way as when setting up a DLNA server. But there is a problem in the Transmission option, which supports the torrent client. Its download and upload speeds are extremely low, so there is no point in setting up a completely useless function of the Lite II router.
Possible malfunctions and ways to eliminate them
Like any other device, Keenetic can freeze, slow down, there are malfunctions, sometimes there is a decrease in performance, and other problems and malfunctions, which usually appear after 2-3 years of using the Lite II. Of course, even the manufacturer will not be able to predict how the Keenetic router will behave in the future, and users are faced with an unpleasant phenomenon: breakdowns happen at the most inopportune moment. Troubleshooting the device is carried out using the debugging mode provided in the system settings of the Lite II router:
- On the home page of the Keenetic router, go to “System”.
- Go to “Diagnostics”, apply the “Start debugging” command.
An icon will immediately appear at the top of the System Monitor indicating the start and progress of the process. In order to see how the correction and debugging of problems in the operation of the Lite II router proceeds, just click on it, and then manually control the process, interrupt it, pause or start it.
Firmware update
It is recommended to update the Lite II router software to the latest version ndms v2 08 abco when setting up the basic functionality of the device during its first connection. The need for this arises for the reason that hopelessly outdated driver versions are often incompatible with the operating system, which leads to inadequate operation of the router and all sorts of problems, including failure of the Keenetic network software. Updating the Lite II firmware is carried out in several ways, but usually begins with downloading the firmware file, which is not necessary if more convenient, simpler and faster methods are available.
Via web interface
 The most common firmware method is used without any “downloading” on the web interface of the Lite II itself. To do this, you only need a local network connection:
- Open the Keenetic main page, go to the “System” settings.
- In “System Information”, enter “Updates” Lite II.
- Select the “Available” link and click on it.
- After the list of Keenetic updates opens, click on the “Update” button.
- When the firmware components are downloaded, reboot the Lite II router if this does not happen automatically.
Via mobile application
 Using this option for updating the Keenetic firmware, you need to download a special application from Google Play or AppStore. Next, open and launch the My.Keenetic service, if it is active; if not, you will need to activate and configure it. Then in the “System” settings of Lite II, select “Firmware”. In the list that opens, select the current update components and click on the “Device Update” button.
Via USB device
Unfortunately, the ability to update the firmware using USB in the Lite II is not provided; such an operation can only be carried out using the two previous methods.
Resetting the router to factory settings
In some cases, unstable and incorrect operation of the Keenetic router leaves no other choice than resetting the device to factory settings. It needs to be reset. If the functionality of the Lite II router is difficult, it is much easier to reconfigure it from the very beginning than to troubleshoot problems. Resetting settings on Keenetic is carried out in two different ways: hardware and software. Hardware is more convenient: the whole process takes less time, literally seconds. All you have to do is press the Reset button on the back of the Lite II with a pin or needle. Using the software method, you need to open the system settings, go to “Options”, click “Return to factory settings”, confirm by clicking on the “Yes” button. Do this after the system warns you about deleting all files previously configured on Keenetic.
Conclusion
The second version of Keenetic cannot be called the best among routers. Lite II is far from ideal: it can please the owner, but also cause him constant irritation.
But this can be said about any device similar to it. The most attractive thing about the router is its low cost. Here we can say that in terms of price and quality, Lite II is the best.
pros
Keenetic has a number of advantages:
- Lite II is easy to use and multifunctional;
- Lite II router web interface in Russian;
- Keenetic has good speed qualities and a wide reception radius;
- clear, simple settings, no difficulty in servicing Lite II;
- Keenetic rarely overheats and does not require frequent reboots;
- Lite II does not “cut” the speed when connecting to a wireless network;
- Keenetic is inexpensive, productive, reliable.
Minuses
Users also note disadvantages:
- low home network speed from Lite II;
- Keenetic has ineffective user support;
- Lite II lacks support for many options familiar to other routers;
- frequent malfunctions and breakdowns that occur after 1-2 years of using Keenetic.
If you have just signed an agreement with one of the Internet providers and purchased everything you need (router, cable), you may want to install and configure network access yourself, without additional expenses for technical specialists. That's why you came to this page and that's why everything will work out for you.
This article will discuss in detail the process of independently connecting the Internet via an Ethernet cable to the Zyxel Keenetic ii router for various providers and data transfer protocols (PPPoE, L2TP, PPTP).
How to start the router?
Carefully remove all components of the device from the packaging and follow the following algorithm when connecting it:
- Unpack and connect the power supply to the device;
- Insert the cable from the provider (the one through which Ethernet data is transmitted) into the WAN port that is selected among all;
- Take it out of the package and connect the connecting cable to the router, as well as to the network card of the main PC: it is quite short, the same at both ends, inserted into any of the five free connectors of the router and the only one available on the computer/laptop;
- Plug in the power supply, then press the power button on the rear panel;
- Wait until the device starts up completely, as a result of which 3 diodes will light up on the indicator panel: power, network, connection to PC.
The new connection should now appear in the bottom right corner of your PC screen. Let's do some preparatory work:
- Right-click on this icon and open Control Center;
- On the right side of the window that opens, the name of your connection will be located, highlighted in blue. Click on it;
- Another window opened. Open properties by clicking on the corresponding button;
- Scroll down the list of parameters for the current connection and find Internet Protocol version 4: select it and open properties (the button below the list);
- Make sure that in both cases IP and DNS are set to receive settings automatically. If this is not the case, set the selectors to the appropriate value;
- Apply the changes.
This completes the preparatory work. Let's move on to the main settings.
Connection setup
When configuring the Zyxel Keenetic ii router, we will use a web configurator common to the entire Kinetic family. Therefore, having learned how to configure this model, you will be able to cope with connecting third and third generation devices and other types like Lite, 4G, etc.
And so, first we need to open this very web configurator:
And now you are in the main menu of the device. In it you can find information about the current firmware (top list on the right), about connected connections (top left), as well as two types of menus: a text menu at the top and a bottom one, consisting mainly of graphic icons. We are interested in the second one – “Internet”.
But before you proceed to entering parameters, find the provider’s contract or obtain the following data from the support service:
- What access protocol is used: we have already listed the most popular ones above (PPPoE, L2TP);
- Authorization data (personal login and password - contained in the contract);
- Is it necessary to specify the IP address as well as the dedicated server name (VPN). These values, if required;
- Is a static address assigned to you, or is it updated (dynamic) in each new session?
- Does the provider register MAC addresses (for example, Dom.ru does this) and, if so, which one belongs to you;
We will need all this to connect the Zyxel Keenetic ii router to the network.
After going to the Internet tab of the main menu, you will see an updated list of tabs at the top of the page. Go to the PPPoE/VPN section and click on the add connection button. In the window that opens, make the following settings:

Example of setting up a router in PPPoE mode
- We check the first two selectors, which will enable the connection and designate it as the main one for accessing the external network;
- In the protocol field, indicate the one that your provider told you. For example, PPPoE;
- If the supplier reported that this is necessary, indicate the server address;
- Immediately after it we indicate our personal data as a user;
- The protection method (i.e. authentication) is set only at the request of the Internet provider;
- Below, if you are supplied with a dynamic IP, we do not change anything. And if it is static, then we select manual settings and enter the corresponding values for the address, subnet mask and gateway used (Some providers do not supply an IP address on the client wan port at all. In this case, you must select the “Without IP address” option);
- All other parameters are optional for owners of the Zyxel Keenetic ii router and are assigned only at the request of Rostelecom, Beeline or any other company with which you have entered into an agreement;
- Click on apply settings and wait for changes to be made to the router configuration;

Example of setting up a router in PPTP mode
If the supply agreement provides for a static IP, and you were unable to configure the connection using the algorithm above, try the following additionally:
- While in the same “Internet” section of the Zyxel Keenetic ii router, open the IPoE tab of the top menu;
- Click on the name of the only interface indicated in the table;
- In the pop-up window, we also check the two top selectors;
- Find the IP parameters line and select the manual configuration method;
- In the fields that appear, enter the data from the provider;
- If domain server addresses were provided, please indicate them below;
- Here you can also specify the static MAC address assigned to you by your provider. To do this, remove the “Default” setting in the corresponding field;
- We apply the changes and check the Internet availability again.

Example of manually setting IP addresses
To be sure, you can reboot Zyxel Keenetic ii and turn it off, then (after 15 seconds) turn on the network adapter of the PC you are using.
If the router is not new, and the setup was carried out previously for other providers, you need to reset the settings to factory settings. To do this, you need to find the Reset button on the back panel of the device and press it for 10-15 seconds, after which the router will reboot. In this case, the login password (1234) and other parameters will become initial. Now you can configure it again and continue to use a high-quality Internet connection using the Zyxel Keenetic ii router.
Found a typo? Select the text and press Ctrl + Enter
How to connect ZyXEL Keenetic 2?


ZyXEL Keenetic 2 is one of the representatives of the large family of ZyXEL Internet centers with a built-in wireless access point. We will tell you how to connect it to the Internet in this article, and you can find answers to other similar questions on our website in the section.
How to connect ZyXEL Keenetic 2: instructions
To set up your router's connection to the Internet, turn it on and connect it to your computer with a network cable. On the router itself, the cable should be inserted into the LAN port, and the Internet provider cable should be connected to the WAN port.
Open any web browser on your computer and go to http://192.168.1.1. In the window that appears, enter admin in the “Login” field and 1234 in the “Password” field. After this, you will be taken to the ZyXEL Keenetic 2 web interface. We will consider setting up a router with firmware version 2 - new Keenetic models come already with it, and old ones are easy to update to it.
At the bottom of the page, click the button with the image of the globe to get to the “Internet” section. Here you can set up a connection using an IP address or via the PPOE protocol - with a login and password. The first is more common, so we will consider this setting option.
Go to the IPoE tab and click the “ISP - Broadband connection” link. A window will appear in which you need to check the “Enable” and “Use to access the Internet” checkboxes. In the “Configure IP settings” menu, select the “Manual” option if you have a static external IP address. Enter this address in the next field, and also fill out the “Subnet Mask”, “Default Gateway” and “DNS 1, 2, 3” fields with information that you can obtain from your ISP.
If your provider registers subscriber MAC addresses on its network, you will also need to configure this setting. If you first connected to the provider’s network with the same computer on which you are now setting up the router, simply select the “Get from your PC” option in the “MAC address” menu. If the computer is different, select the “Enter manually” option and enter the desired address. Well, if the MAC address is not important for your provider, you don’t have to configure anything here.
After filling in all the required data, click the “Apply” button. The router will save the settings and reboot.
The file on the computer was located on a virtual RAM disk. Keenetic II Giga and Ultra have lower speeds than the USB 2.0 interface - about 30 MB/s. Keenetic II, taking into account a 100-megabit connection, has 5-6 MB/s. These are good indicators. At the same time, performance practically does not depend on the disk itself. In tests with an inexpensive flash drive and an external hard drive Seagate Backup Plus SRD0SP0, it differed by literally 0.5 MB/s.
When simultaneously copying different files from two different USB drives, the total speed is approximately 10-15% lower. However, it is divided unevenly. Therefore, if time is critical and the files are very large, it is better to copy them one by one.
In Windows, the printing device is connected by creating a TCP/IP printer port. The ZyXEL website has detailed setup instructions.
There were no problems connecting the modem. All parameters for the recognized adapter are set automatically. The list of compatible modems can be found on the manufacturer's website. Routers support automatic switching to a modem connection if the main one is lost.
Testing
To test Keenetic, two wireless adapters were used: a dual-band USB adapter TP-Link TL-WDN3200 and a dual-band internal TP-Link TL-WDN4800. Measurements were made using the Ixia IxChariot package with heavy traffic simulation. For best performance, routers were tested at 2.4 GHz in 802.11n only mode. At 5 GHz, 802.11a/n was used because ZyXEL only provided a choice between a and a/n. The devices were located in the same room, opposite each other. The 2.4 GHz airwaves were lightly loaded, and in the case of Keenetic Ultra it was the only one in the 5 GHz range. The transmitter power was 100%. Note that “kinetics” allow you to regulate it yourself (by 10, 25, 50, 75 and 100%), which can be useful so as not to interfere with other access points located nearby. Otherwise, a switched on but empty 5 GHz network does not interfere with the 2.4 GHz network.


