How to turn on a connected webcam on a laptop. Turn on the webcam on the laptop. What to do in this case
If, after purchasing your first mini computer, you don’t know how to open, use or enable the built-in webcam on an Acer Aspire one d270, 5750g, e1-531, 5560g, e1-571g, 5552g, 5742g, 5755g laptop, netbook or any other model, don’t worry .
I can assure you that none of the “newbies” knows this, but after reading the information in this article, you will definitely turn on the camera on your Acer laptop and not only on it, but also on all other PDAs.
Lots of people are looking for Acer online. Do you know why they fail to complete such a simple task?
Because to turn it on you definitely need a program, but the Acer laptop simply doesn’t have it.
This is especially true for those where the operating system is installed independently (perhaps some pre-installed ones have it).
In addition to the program itself, in order to enable, open and use the web camera, you definitely need native drivers.
Where can I get them from? Everywhere on the network, when asked in search engines, the same thing is written: download the Acer Crystal Webcam driver.
But if you try to download it, you will find nothing but viruses.
In fact, you need to do differently, regardless of whether you have an Acer netbook or a laptop like the Acer Aspire one, 5750g, e1-531, 5560g, e1-571g, 5552g, 5742g, 5755g series.
Where to download drivers for Acer webcam
Everything is very simple, but for some reason this is not written anywhere, or rather there are very few descriptions.
So, write the following in the Google search engine: “acer support”, only without quotes, and follow the link as shown in the figure below, just do not get confused.
Next, also look at the picture below and click on where it says: “drivers and manuals” and wait until the page loads completely.  Now to download the driver for your acer laptop so that you can enable the built-in webcam, follow three steps, namely: first click laptops, then decide on the model (Accessories, Aspire, Extensa, Ferrari, TravelMate) and select the modification. In my case, as shown in the figure below: laptop - aspire - Aspire 1820PTZ.
  Now scroll down the page a little and decide on the operating system of your laptop.
Here we come to the end. Going a little lower, calmly download the driver you need completely free of charge.
In my case there are several of them. If this also happens to you, determine what kind of built-in camera you have.

Acer laptop camera program
You can find out in the image processing device line, just expand it by clicking on the barely noticeable black triangle on the left.
That's all. I think it’s impossible to explain in more detail how to enable the built-in camera on an Acer laptop, although anything can happen.
If you have any questions, write them in the comments and you will definitely receive an answer. We will decide together. Good luck.
Many of modern laptops and netbooks have at their disposal the entire technological arsenal for comfortable work on the Internet. And, of course, it cannot do without a built-in camera, thanks to which the user can arrange video conferences and send photos and videos to their friends. But not all users know how to turn on the camera on a laptop. In this article you can find the answer to this question.
First, you need to make sure that the laptop actually has a camera built into it. It is most often located in the central part of the upper half of the laptop, directly above the device’s display. Sometimes manufacturers build in a small LED next to it (this is what will signal that the camera is on) or make a self-explanatory sign “Webcam” or “DigiCam” next to the device’s eye. If such signs of the presence of a camera could not be found, you can look for information about this in the passport or operating instructions of the laptop. After this, you can move on to the question of how to turn on the camera on a laptop.
Most often, the camera built into the device is launched by pressing a simple key combination. For example, on almost all Asus laptops this happens using the “Fn+V” combination (in this case, you can easily find the camera image on the “V” key). But don’t despair if you couldn’t find this combination on your device. There are several more options for how to turn on the camera on a laptop.
First, you need to make sure that all drivers and software for the built-in camera are installed. If any of the software is missing, you will need to go to the manufacturer’s website and download from there all the missing utilities and programs. Most often, laptops from popular global brands use software such as “Willing Webcam”, “Webcam Plus!” and “Active WebCam”, but other software may be suitable for a specific laptop model. After installing all the necessary drivers, the camera will turn on automatically immediately after launching the corresponding program.
But how to turn on the camera in a laptop if, after installing all the necessary software, it does not want to start? You can try to run the installed program manually. To do this, you need to click on its shortcut or launch the corresponding utility from the start menu. In most cases, the camera on a laptop or netbook turns on immediately after this.
Another surefire way to get the built-in camera to work is to enable it from the Control Panel (the user will find it by left-clicking the famous Start menu). In the “Control Panel” we find a section called “Scanners and Cameras” and select the built-in camera in it. Once started, this device should turn on immediately.
If none of the methods described above helped achieve the goal, you can use one of the utilities from third-party developers. Hundreds of such programs can be easily found on the Internet, but before launching them, it is advisable to check all downloaded files with an antivirus. You can also visit the official website of your laptop manufacturer. Often on this resource you can find information about which third-party programs are ideal for a specific device model.
We should not forget that in some cases the user does not even have to rack his brains about how to turn on the camera on a laptop. The developers of popular programs for communicating via the Internet have already taken care of this. For example, after installing and launching one of the most popular communication programs called “Skype”, the laptop’s built-in camera will start automatically.
A webcam (webcam) is an integral part of the vast majority of laptops. By default, after the first start of the device, it is immediately ready for use. But what if you are trying to get an image from the camera, but there is none?
The main thing is not to panic. Situations when the webcam does not work on a mobile computer are most often due to the fact that it is simply turned off or not installed in the operating system (breakdowns of this device, fortunately, are rare). Read below to learn how to turn on the camera on a laptop and troubleshoot related problems.
How to quickly check if the camera is working
To find out if your webcam works at all (perhaps it doesn’t work in only one program, since it’s disabled in the settings), go to the service and click “ Check webcam».

If you see a request to allow access to the device for Adobe Flash Player, then everything is in order: the camera is working. Check " Allow» and check if the image appears on the screen.

If you see a message like in the screenshot below, it means the camera really isn’t working. We’ll figure out what to do in this case further.

Checking the status of the webcam in the system
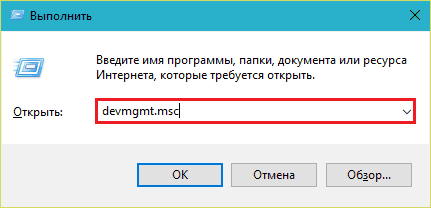
We begin diagnosing any hardware problems by checking how it appears in Device Manager. To open the manager, press the Windows + R hotkeys (this will launch the “Run” application), enter the command in the “Open” field devmgmt.msc and click OK. The method is convenient because it works in all versions of Windows.
In the dispatcher window, expand the list “ Imaging devices» and see if our webcam is there. The following options are possible:
- The web camera is not in the list of equipment - the computer does not see it. This happens due to a hardware failure or physical failure.
- There is no camera, but there is an unknown device, which most likely is it. This means that the computer sees it, but cannot recognize it. The reason is the lack of a driver.
- There is a camera in the list, but next to it there is a yellow triangle with an exclamation mark or a black arrow in a circle. The first indicates a malfunction, the second indicates a shutdown in the operating system.

Turn on the webcam from the keyboard
The function of turning on/off the webcam from the keyboard is not implemented on all laptop models. Where there is one, a miniature image of a camera is applied to one of the keys. Most often this is the “V” key, sometimes “Escape” or others from F1-F12.

To turn on the web camera, press this key simultaneously with “Fn”. After this, the webcam should appear in the device manager. If it's still not there, you probably have that rare case where it's physically faulty or not connected.
Installing the driver
If, after turning on the webcam hardware, something unidentified appears in the device manager, install the driver for it. It is best to download it from the website of the laptop manufacturer or the webcam itself, if you know exactly its model. Or install from a disk, if one was included with your device.
If you do not know the exact name of the laptop model, turn it over. There is a sticker on the bottom cover of every laptop stating this.
This is what the brand label of the MSI MS-1757 laptop looks like:

Having determined the model, find it on the manufacturer’s website and download the driver for your operating system in the “Support” section. Install as a normal application, after installation, reboot the machine.
By the way , there may not be a separate webcam driver for some OS versions, since it is included inWindows (USB Video Class Driver). Problems with this group of drivers can be resolved by installing updates or .
Fixing webcam recognition errors in the system
If the webcam is marked with a black arrow in Device Manager (disabled in Windows), right-click on it and click “ Engage».

When disabled in the operating system (by the user or programs), this is enough for it to work.
If the webcam is marked with an exclamation mark on a yellow triangle, which means: “the device is not working properly,” click the command “ Delete" and restart your computer. The system will recognize it again and automatically reinstall the driver.
If it doesn’t help, click “ Update drivers»:
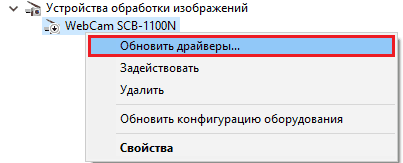
Specify the search location as the Internet (if you are not sure that the correct driver is present in the system) or this computer (if the camera worked properly with the old driver before the problem occurred or you have a recent version).

First of all, to start working with a webcam, you should make sure that it is correctly connected to the equipment, in this case - to a laptop or computer. This applies to the option when a separate USB camera is used. If it is built-in, then other methods will be used to launch it.
Webcam - ample opportunities for your communication
The Internet gives us even more opportunities to communicate. In addition to various chats and email, another type of communication is now gaining popularity - video. This technology will allow you not only to talk with your opponent, but also to see him through the monitor. What do you need to get the webcam working in Windows 7? This requires two main components:
- computer or laptop with Windows7 OS;
- webcam.

Instructions on how to enable the camera in Windows 7


Finding the right program
When we look for software that uses video, the first thing we do is go to the Windows Compatibility Center. This is a fairly convenient resource for finding compatible programs and devices.
When choosing a model, be guided by certain functions. If you purchased the device with a built-in camera, then it is quite possible that you will no longer need another one. But the choice is always yours, since both have advantages. The internal camera is compact and is always with you, and the external one will provide higher quality video.
- do not enter standby mode with instant activation of the system until the power indicator turns yellow;
- the person who set it up must once again make sure that the camera software is compatible with the required version of Windows;
- if the camera is not recognized, you should disconnect it, and after a minute or two try to connect it again;
- If there are problems, check the webcam on another laptop;
- If the video quality is poor, you can reduce the size of the video image or close all other applications and tasks.
To learn in more detail how to turn on a webcam on a computer with Windows 7, you can use the video from our website.
Almost all laptops have a built-in web camera for conferences and negotiations. But difficulties often arise and owners of laptops with Windows 7 cannot enable it, since this operating system, unlike the previous version of Vista, is no longer equipped with the corresponding WindowsMovieMaker application.
Windows 7 users have to download it from the Microsoft page. The program can be found on the official resource under the name “Film Studio”.
 This utility allows you to record video from a web camera. You can also turn on the video device using special applications and services for video conferencing.
How to check and turn on the camera?
There are many sites for video chats, for example, http://vchatting.ru/, http://chatroulette.com/, http://davaipogovorim.ru/, http://videochatru.com/, http://chatroulette. ru/, http://chatrandom.com/. By visiting any of these pages on the Internet, you can check and configure the video device on a laptop with Windows 7. If the web camera is working normally, an indicator will light up next to it, warning the user about the functioning video device, and the image captured by the web camera will be displayed in the browser.
Problems occur when the device cannot be started
Before you get started, you need to see if the device is blocked by an object, sticker, tape or paint. You need to see if the device is enabled in the BIOS. And also, there are laptop models on which you can launch the webcam by pressing the “Fn” and “Camera” keys (you just need to find the button on the keyboard with its image).
If the camera does not function even with the latest software, it is recommended to remove the device.
To do this, you will need to do the following in Windows 7:

How to set up a webcam using Skype?
This method is one of the easiest and most reliable. You just need to turn on Skype on your laptop and click “Tools”. Next, go to “Settings”, where to enter "Video Settings".
 A video image from the camera should appear. Then press the button located under the image "Webcam Settings". This will open a menu with options to configure the device.
How to turn on the webcam remotely in Windows 7?
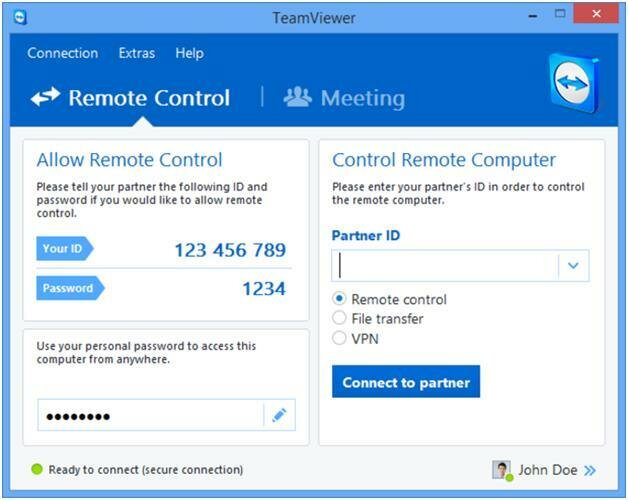
Windows 7 has "Remote Assistance", which allows you to turn on and configure the webcam remotely. And also in Windows 7 you can use the “TeamViewer” or “Radmin” applications.
 Threats, or how attackers are able to turn on and monitor a user using a laptop camera
Hackers have a special word “ratting”, which sounds approximately like “rat” in English, as it comes from the abbreviation RAT "Remote Administrator Tools". It is used by attackers to remotely control computers and all devices connected to it.
Most often, malicious software ends up on a laptop after visiting a certain website on the Internet. Using this software, a hacker can easily turn on the video equipment of a laptop and calmly film what is happening in front of it.
To avoid this you need the following:
- do not visit suspicious pages on the global network;
- monitor Windows 7 and software updates;
- do not open sites received by email if the sender is unfamiliar;
- use antivirus utilities.
Disabling the webcam
If a simple webcam with a USB port is connected to your laptop, you can simply disconnect the cord. In the case of devices built into the laptop lid, you need to find a video camera in "Device Manager", then call up the context menu and click on the line “Disable”. And also sometimes there is a mechanical switch on the laptop case. The status of the web camera is indicated by a light indicator located in close proximity to the video device's eye.