How to check which Windows is on a laptop. How to see which Windows is installed on your computer. How to find out which version of Windows is installed on your computer
As a rule, beginners often have the question of where to look and how to find out what version of the Windows operating system is installed on their computer. There are plenty of ways to find out. You will learn the simplest of them from this article.
Method 1 - Computer Properties
This method is the fastest, easiest and works in all versions of Windows OS. Primarily due to the fact that it does not require the installation of any additional programs and utilities.
In order to find out the version of Windows OS on your computer, just find the computer icon on the desktop or in the Start menu, right-click on it and select “Properties”.
Go to computer properties
At the very top of the window that opens, you will see the version of Windows installed on your computer, its Service pack, as well as a lot of other useful information, such as installed volume and.

We look at the version of Windows without installing programs
Method 2 - Using the dxdiag command
Everything here is also very simple. There is no need to install or configure anything additional. Open “Start”, select the “run” command or simply enter the command in the search bar dxdiag(you can copy and paste from here).
You can also call up a window for entering this command using the key combination “Windows (second button at the bottom left) + R”.

Entering the dxdiag command to view the Windows version
After entering or copying the command dxdiag press Enter. If you suddenly receive a request to check the digital signatures of drivers, click “no”.

Installed version of windows on the computer
The best way to thank the author of the article is to repost it on your page
We all like to play some computer toy from time to time. But sometimes our machines cannot cope with the load. Often the video card is to blame: outdated and budget solutions do not implement modern graphics and textures. Let's look at how to find out which video card is on a computer or laptop and find out the differences between an integrated and discrete video card.
Advice! If you are planning to buy a laptop for gaming purposes, be sure to choose machines with discrete graphics.
How to view a video card
Let's start with the fact that there are two types of video cards on a laptop: integrated and discrete.
An integrated video chip is a graphics adapter built into the motherboard that uses the resources of the processor and RAM. Such cards do not have high performance and are intended for using a laptop for office purposes.
A discrete graphics card is a separate graphics module that has a separate processor, memory and cooling. Capable of supporting many games with multi-level graphics. Let's look at how to determine the type and model of a video card.
Using Device Manager
You can find out which video card is on your computer through the device manager as follows:
- Go to “My Computer” and click on the “System Properties” button.
- When the Properties window appears, click Device Manager.
- Expand the list of video chips and find out the model of your video card.
Using equipment ID
If for some reason the model name of your video card is not displayed, there is a second method. In the same “Device Manager”, double-click on the name of the video card and go to the “Details” tab. Here, select Hardware ID from the drop-down list and copy the third value. 
Go to this site and determine the model of your video chip. 
How to find out the OS
Sometimes you need to find out what operating system (OS) is installed on your computer or laptop. This may be required in several cases, for example, if you need to find drivers for a printer or MFP, and for this you need to know the type of operating system and its bitness (32 or 64 bit). Let's look at possible ways to determine the OS type.
Method for Windows XP, Vista, Windows 7
Step 1. Click on the “Start” button, which is located in the lower left corner of the screen, and then, with the right mouse button, click on the “Computer” or “My Computer” button.

You need to right-click on the “Computer” or “My Computer” button - depending on the operating system
Step 2. In the context menu, select the “Properties” command.

In the context menu, select the “Properties” command
Step 3. In the window that appears, we can get all the necessary information regarding the operating system. In this particular case, 64-bit Windows 7 Basic is installed on the computer.

Operating system type and bit depth
Please note that in addition to the type of operating system and its bitness, we received other useful information about our computer:
- Processor type;
- Service Pack version;
- Windows Experience Index;
- The amount of installed RAM.
Method for Windows 8
Windows 8 can be easily identified visually by the “tiles” on the screen.

Windows 8 is easy to distinguish by its interface, but you need to keep in mind that it can be either 32-bit or 64-bit
Let's use the Microsoft website help system:
- Swipe in from the right edge of the screen, then tap Search. Or, if you're using a mouse, move your pointer to the bottom right corner of the screen and click the Find button.
- In the search field, enter “system information.”
- Tap or click the System icon, tap System Information or click the button System Information.

Click the System Information button
You can now view detailed system information.

The laptop has 64-bit Windows 8 version 8.1 installed
A universal way to identify all types of operating systems
This method requires an Internet connection. All you have to do is go to http://bilet.pp.ru/calculator_rus/moya_os.php.

The service determined the operating system (Windows 7) and browsers used on the computer
We hope you can now recognize your operating system. If you have any questions, ask them in the comments.
Which is installed on the computer, can arise in a variety of situations. For example, in most cases, in order to download, you must first specify your version of Windows.
If you find yourself in a similar situation and don’t know your version of Windows, then this article should help you. We offer you several ways to find out which Windows is on your computer.
Method number 1. Computer properties.
If there is one on your desktop (namely an icon, not a shortcut), then you can find out which Windows is on your computer using it. To do this, right-click on this icon and select the “Properties” menu item.
After this, a window will open with information about your computer. The Windows version will be indicated here, as well as basic information about the computer (processor name, amount of RAM).

There is also information about the bitness of your operating system. Almost at the very bottom of the window, opposite the “System type” item.

It should be noted that if you do not have a computer icon on your desktop, then you can call up this window using the Windows key combination + Pause/Break.
Method number 2. WinVer command.
The second way to find out which Windows is on your computer is the WinVer command. Press the Windows + R key combination and enter the WinVer command in the menu that appears.

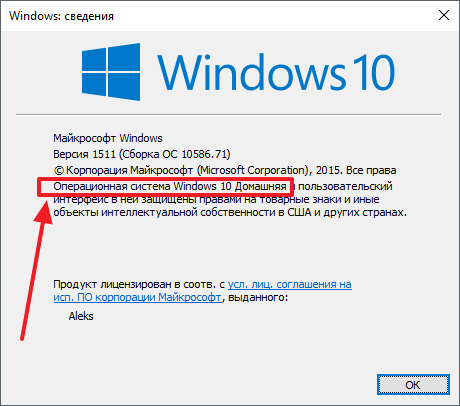
After this, a window will appear on the screen with basic information about your operating system. Here you can find out which Windows is installed on your computer, as well as its version and build number.
Method number 3. Systeminfo command.
Another useful command that will allow you to find out which Windows is installed on your computer is the systeminfo command. To use this command, type systeminfo and press enter. After this, basic information about your computer will appear on the screen. Among this information you will be able to find your Windows version.
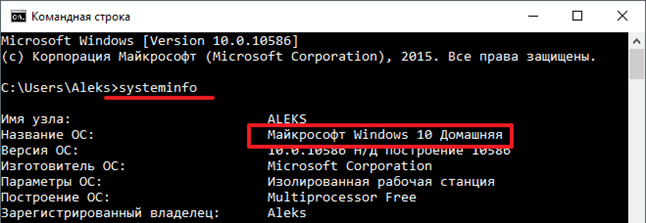
You can also execute this command in another way. To do this, press the Windows + R key combination and enter cmd /k systeminfo in the window that opens.

In this case, the Command Prompt will be launched first, and only then the systeminfo command will be executed in it.
Method number 4. System Information window.
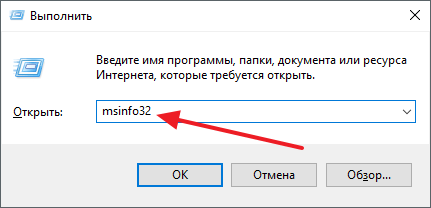
The last method we'll look at is the System Information window. To open this window, press the Windows + R key combination and enter the command msinfo32 in the window that appears.
After this, the “System Information” window will open in front of you, in which you can find out which Windows is installed on your computer. Finding this information will be easy because it will immediately appear before your eyes.

If you have any difficulties executing the msinfo32 command, you can open this window by searching in the Start menu. To do this, simply enter “System information” into the search and open the found program.
Almost every PC user can distinguish Windows operating systems from each other by external features, unless, of course, visual modifications are installed. However, determining a specific version, build, bitness or update without obtaining information from the computer is unrealistic, even for professionals. In this case, everyone uses system information or third-party programs. Let's take a closer look at how to find out the version of Windows on a PC or laptop.
Properties/About window
Checking the installed version of the Windows operating system begins with the simplest and fastest operations. Pay attention to your PC desktop. If you use the “This Computer” shortcut in the case of “Windows 10” (for XP, 7 and 8 – “My Computer”), then you need to do this:
- Right-click on the shortcut and select “Properties” from the menu.
- A window will appear on the screen containing information about the installed OS. Here you need to pay attention to the marked lines:
Windows edition (1) refers to the generic name of the OS version. In the “System” subsection you can see the parameters of the central processor, RAM and bit depth (32 or 64-bit) - the latter also applies to OS properties (2). Below is activation information. If you see the same inscription as in the screenshot (3), this means that the system has already been activated previously.
When installing the operating system, the user chooses between x64 and x86 versions. The software properties themselves indicate either x32 or x64. Beginners should know that the 32 and 86 bit versions are the same thing.
The same window can be opened without a shortcut on the desktop:
- First, open the “Control Panel”. For example, through the search bar.
- In the “Small Icons” view mode, open the “System” section.
- Again we see the same window, which contains information about Windows:
However, the presented method does not contain more detailed information - the build version (OS build) and the installation date on the hard drive. You can get this information about your “computer” like this:
- To see which build of Windows is installed, right-click on the Start menu icon. In the menu, select the “Options” section.
- Go to “System”.
- Scroll down the left column and find the “About the system” tab.
- In the “Device Characteristics” subsection you can find: bit depth, product number, computer name, processor model, amount of RAM.
- In the "Windows Characteristics" section - OS release, update version, build and installation date. You can also go to computer properties from this window using the marked button.
The option with the “Settings” window is only suitable for Windows 8 and 10. The first method is relevant for all operating systems starting from Windows XP SP1.
Executable commands
You can check the version of Windows on a PC or laptop without “travelling” through the OS menu. To do this, you need to use the functionality of the Run application:
- We use the combination Win + R. Enter the command msinfo32 into the field and start execution.
- The System Information window appears on the screen, where you can find out even more information on the main tab. You can see the data type in the Items column in the screenshot:
- You can also use this utility to learn more about hardware, components, and programs.
Now another application that is launched via “Run”:
- We also open the window with the combination Win + R and enter winver.
- An information window opens in which you can view the version and build of the installed Windows.
The final command for the Run application is described below:
- Enter the command cmd /k systeminfo and start its execution.
- On the screen you will see a command line that will automatically collect the necessary information into a table.
- In addition to a description of the operating system, here you can find out the BIOS version, the size of the swap file on your PC, the number of network adapters and the Internet connection ID.
The Run application also allows you to quickly open the System Information section, which is described in the previous section of the instructions. To do this you will need the ms-settings: about command.
The described methods are used by both 32 and 64-bit operating systems from Microsoft.
Now let's look at those methods that allow you to install the exact version and build of Windows via the command line. To do this we do the following:
- Launch the command line. This can be done through search.
- In the window, enter wmic os get and press the Enter key.
- After a second, a list of basic system information will appear on the screen. They are marked in the bottom screenshot:
You can also enter systeminfo, msinfo32, winver through the command line.