Where are the layers in coreldraw? Using layers in CorelDRAW. Setting illustration area properties
In this exercise, we'll use some of the properties of layers to organize headers and footers (pieces that repeat across multiple pages).
in a multi-page document. Let's say we need to prepare a layout of a four-page folding sheet for distribution at a public event. The customer demanded that the main material of the sheet (we will not be interested in it in this exercise) be arranged on pages with a telephone number at the bottom of which. In addition, the customer’s logo should be placed in the middle of even-numbered pages (we will use clipart instead).
1. Start by creating a new document. Since a folding sheet is to be developed, the page dimensions will be non-standard (say, half a sheet wide and a full A4 landscape sheet high). Click the button New(New Document) in the standard toolbar, and when the image of the first page appears in the document window, set the width of 148.5 mm and height of 210 mm in the print page size fields of the attribute panel. Add three more pages to your document by triple-clicking the plus sign in the group of page turning buttons located in the lower left corner of the document window.
In fact, this page size is not non-standard - it is A5 format. But the trick of specifying a non-standard page size works in this case too.
2. Using the add new layer button in the dockable Object Manager window, create a new layer and immediately rename it Header and Footer. Create another layer and name it Logo. Since the main composition of the layout should be placed on top of the logo, drag the row corresponding to the logo layer under the row of Layer 1 (which will contain the objects that make up the layout).
3. Click on the name Footer to make this layer active. Create a block of curly text at the bottom of the page and enter header and footer text into it, for example:
Our phone is -111-22-33
Remember to align the text to the middle of the page using the Align and Distribute dialog box.
4. Currently, out of all four pages of the document, the text is located only on the Header and Footer layer of the fourth page (make sure of this by going to the third page, and then returning to the fourth). In order for this text to appear on all pages, the Header and Footer layer should be made the main one. To do this, select the command Master(Main) in the layer's context menu. You can also simply drag the row of the Header and Footer layer from the fourth page to home page(Master Page). As a result of any of these actions, the row of the Header and Footer layer will disappear from the sections of all four pages of the document, and the row of the Master Header and Footer layer will appear in the section of the main page. Review the document and make sure that the footer text appears on all pages.
5. Now let's work on the logo. Let's start by setting the visibility attribute of the Logo layer for various pages. By default, it is installed on all pages, so all you have to do is click on the eye icons in the lines corresponding to this layer in the sections of the first and third pages. Go to the fourth page, where the Logo layer is displayed on the screen, and import an image from the clipart library that will replace the logo for us (in this example, the role of the logo is played by the image /Awards/Plaques/SymbO68.cdr). Enlarge it to the desired size, align it to the middle of the sheet, unstrokes the contour lines and set the fill color to 10% black.
6. All that remains is to make the Logo layer the main one. To do this, right-click on the layer line in the section of the fourth page and select the command from the context menu Master(Main). The task has been solved - the footer is reproduced on all pages, and the logo is reproduced on even pages (Fig. 9.20).
Rice. 9.20. Result of the exercise: the first two pages of a multi-page document and the Object Manager window
It is very important that the command to turn a layer into the main one is executed specifically for the line of the section of the fourth page into which the drawing was imported. Otherwise the main layer would be empty. After turning a layer into the main one, the visibility attributes set when the layer was still normal are preserved for each page.
7. To complete the exercise, place some text in the middle of the screen on the Logo layer, make sure that the change you made is reproduced on all even-numbered pages, and click on the pencil icon to lock the Logo layer. Now you can start developing the actual layout - the headers and footers are ready.
Layers provide an effective means of organizing objects created with CorelDRAW. Using layers makes your work faster and easier and makes your design clearer.
How to use layers when creating projects?
- Multi-page documents- objects that should be displayed and printed on all pages, as well as objects that should appear only on certain pages. An example of such a document is a wall calendar, where all pages use a common heading, but the dates on each page are different.
- One page document- several bank checks for the customer, the background of which is the same, but the bank details (bank name, account number, contact details, etc.) are different. I use layers when I design checks for clients that shareholders can receive dividends with the details of different banks.
Preparing to work with layers
Before you start working with a new CorelDRAW document, you need to do some preliminary preparation. I prefer to determine the overall design of the project, its contents, and the approximate placement of objects in advance.
Creation multi-page document with layers
The first step is to specify the page size of our project when opening a new document. By default, CorelDRAW creates a new document with one layer, called Layer 1. Open the Object Manager settings window ( Window>Settings windows>Object Manager).
The second step is to create the required number of template layers by pressing a button Create a master layer(see Fig. 1, element 5) in the object manager settings window. Master layers will appear on all pages of your project. Then create the desired number of layers by clicking the button Create Layer(see Fig. 1, element 4).
This article covers images from the Calender job. I used four layers and two master layers.
Your page is now ready to go.
Advice. CorelDRAW creates new layers on top of existing ones. Therefore, they must be created in the order in which they should be located in the project.
The third step is to create 11 copies of the open page to get 12 pages. Click tab Page 1 located at the bottom of the application window, and select the option from the drop-down menu Duplicate page. Since you haven't added objects to the page yet, leave it in the window Duplicate page default settings and click the button OK.
Note. When choosing a team Layout>Inserting a page pages are added to the file, which by default contain one layer. In this case, all the necessary layers must be added to each page separately, which can be time consuming.
After completing the three steps above, your wall calendar document will be ready to use.
Before we look at the example, I would like to talk about some important features of the object manager.
Introducing the Object Manager setup windows
The Object Manager settings window (Fig. 1) allows you to view the current state of the document structure, simplifying the management of layers and objects. This window shows all the pages of the active document with all the layers on each page and the objects that are on each layer on each page.
Rice. 1 - Object Manager
(for clarity, the user interface is shown in English)
Below are descriptions of the elements in Fig. 1.
1 - button Show object properties.
If this button is clicked, the properties of all objects in the selected layer will be shown. If you click the "+" symbol at the beginning of any page, the Object Manager setup window will provide detailed information about all objects.
2 - button Edit Unclosed Layers.
Clicking this button allows you to work with any object on any layer, regardless of whether it is active. If this button is not pressed, to work with objects on any layer, you must first select and make the corresponding layer active. In other words, all objects on all layers except the active one will be temporarily locked and unavailable for use.
3 - button Layer manager view.
Enabling this view allows users to control the hierarchy (or sequence) of layers and change their location.
4 - Button Create Layer.
Create a layer on the active page.
5 - Button Create a master layer.
Creating a template layer on the main page of the document.
6 - Button Delete layer.
Deletes the selected layer and all objects on it.
7 - Setting up regular layers added to the page. By default, CorelDRAW gives layers sequential names (for example, Layer 2, Layer 3, etc.). To improve your experience and make it easier to find the layers you need, you can rename them.
8 - Default template layers. The Guides, Desktop, and Grid layers are the default layers. They cannot be removed from the document.
9 - Setting up template layers added to the main page and renamed.
Now let's look at the layer properties buttons. Each layer has three buttons that help you change the properties of that layer.
Icon eyes indicates whether the layer is visible. If this icon is clicked, the layer objects are visible, and if not clicked, they are hidden.
Icon printer controls whether a layer can be printed. If this icon is clicked, layer objects can be printed and imported, otherwise they cannot be.
Icon pencil indicates whether the layer is editable. If this icon is clicked, layer objects can be selected and edited, otherwise they cannot.
Advice. Typically, visibility and printability are turned on and off at the same time. Remember that a visible layer cannot be exported or printed if printing is disabled. If printing is enabled, then you can even export and print an invisible layer.
You can also make a layer visible but not print it, so that project notes are not printed. I use a layer like this to store print settings and other job information that needs to be available at all times.

Rice. 2
(for clarity, the user interface is presented in English)
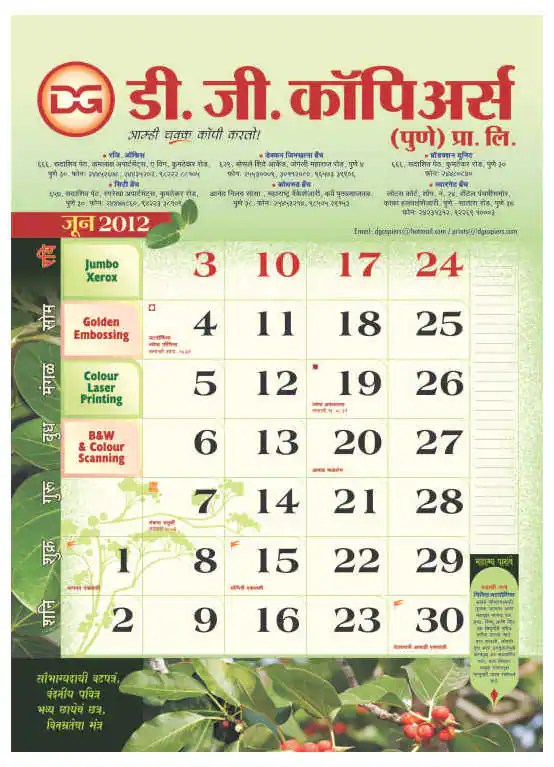
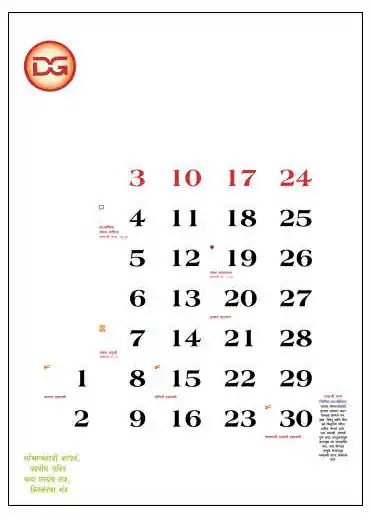
Now we'll look at how to use the Layer Manager view. This view allows you to change the order of layers on the active page. In Fig. Figure 2 shows the order of layers on the page "Page: 6: June".
If necessary, layers can be moved to any desired position.
Advice. The Layer Manager view allows you to toggle the visibility of layers, as well as the ability to edit and print them.
For this demo assignment I will need the following layers:
- two template layers;
- four layers on each page.
Rice. 3
Background template layer
We have created two template layers: the first one will contain all the objects necessary to create the general background of all pages,
and on the second - the names of the days of the week common to all pages.
Since the project uses two template layers, they must be placed in different sequences.
Normal background layer
On each page I use four layers on which I add dates, advertisements, a logo, the name of the month, as well as photos and background images.
Dates(Dates): Each page shows the dates of each month on that layer.
Logo&Month(Header and Month): This layer contains the main header and month name.
Back & Photos(Background Image and Photos): On this layer I placed the photos and objects used to create the background of each page. Since each page must contain different photos and objects, this layer is created on all pages.
The order of layers and placement of objects in a 12-page calendar

Rice. 4
Background(Background): template layer.
Bottom layer. Objects that must be visible and can be printed on all pages.

Rice. 5
Back & Photos(Background Image and Photos): Normal layer.
Second layer from bottom. Unique objects placed on each page. Each page contains different photographs and objects.
Rice. 6
Logo&Month(Footer and Month): Normal layer.
Third layer from bottom. Unique objects placed on each page. Each page displays the name of the new month and uses a unique font color for the company name.

Rice. 7
The fourth layer from the bottom. Each page advertises different services. The placement of advertisements varies from page to page.
Rice. 8
Dates(Dates): normal layer.
Take advantage of CorelDRAW® Home and Student Suite X8 to create projects for your home and school.
The new version of CorelDRAW Home & Student Suite X8 for home and study offers professional graphics quality and extensive photo processing capabilities at an affordable price. Includes easy-to-use tracing, layout, and photo editing tools found in Corel® PHOTO-PAINT® and Corel® AfterShot™. CorelDRAW Home & Student Suite X8 for home and school is designed for hobbyists and students of all skill levels, cost-effectively, and allows you to quickly and confidently create logos, newsletters, reports, photography projects and social media content.
Of course, layers involve some of their own nuances and require certain preparation for successful work. But a little diligence and patience is enough for this particular tool to open up impressive opportunities for successfully solving the assigned tasks. We will carefully consider the questions, what is needed to combine them, how they can be decomposed - and other characteristic questions.
Let's say right away that in practice they have proven themselves to be quite an effective and convenient tool for organizing elements that were developed in the CorelDraw software environment. The software tools available today make all the work much easier and faster, resulting in a clearer design.
In practice, working with them opens up wide opportunities for different projects; you just need to take into account a few nuances. In particular, such a tool becomes an important aid when working with multi-page documents - when there are elements that must be reflected on all sheets during printing.
First of all, before working with a new document, it will be useful for each user to conduct appropriate preparation. Namely, decide in advance on the overall design of the project, its contents, the approximate location of the necessary elements and other parameters.
In the first step, we have to set the page size of our project when a new document appears. It is important to remember that a new document in CorelDraw is created with one layer. Here it is denoted as “1”. Open the object manager window (Window - Dockers - Object Manager). Using the Object Manager, you can perform operations on layers.

At the second stage, we create the number of layers required for our tasks. To do this, select “Create template” in the object manager window that we opened. Template layers will appear on all pages of the project. Set the required quantity here using the “Create” button. After we have set the required number for our project, we can proceed to working directly with them.
How to work with layers in Corel - basic functionality and operations
To add, open “Tools” - “Object Manager”. Here at the top right you should click the drop-down button, and then click “Create”.
To select an active one, just click on the line in the list of the object manager window corresponding to it.

Each layer has three characteristic properties:
- The “eye” icon indicates the visibility or invisibility of specific objects.
- Thanks to the “Printer” icon, we set the permission to print this element. Therefore, importing and printing it will be possible only if this parameter is active.
- For editing, use "Pencil". When you click it, you can change all fragments.
What should I do to remove it? In fact, the procedure here is much the same as adding it: open Tools - Object Manager. Here we click on the selected layer and select the “Delete” option. It is important to remember that along with such deletion, the objects located here will also be lost.
Let's look at some common questions
How to decompose a picture into layers in Corel - a simple algorithm of actions
The ability to decompose opens up many additional possibilities for arranging objects in various complex patterns. In particular, it is possible to divide a drawing into several layers, containing part of the drawing on each of them. In particular, such work is possible when developing the architectural plan of a building. It’s worth considering right away that all these decomposition operations must be performed entirely manually; there is no automatic function here. Therefore, if the number is more than ten, carrying out this procedure in Korel will be quite tedious.
How to add a second layer in Coreldraw
To add a layer, open “Tools” - “Object Manager”. Here at the top right you should click the drop-down button, and then click “Create”.
We reviewed the main current issues regarding working with this current functionality. We determined where the layers are, how to add, edit and delete them - everything else depends individually on the specific tasks, preferences and imagination of the user himself.
All that remains is to wish you good luck in effectively working with this relevant and useful tool, which makes the usual work of designers much easier and more convenient.
Layers provide an effective means of organizing objects created with CorelDRAW. Using layers makes your work faster and easier and makes your design clearer.
How to use layers when creating projects?
- Multi-page documents- objects that should be displayed and printed on all pages, as well as objects that should appear only on certain pages. An example of such a document is a wall calendar, where all pages use a common heading, but the dates on each page are different.
- One page document- several bank checks for the customer, the background of which is the same, but the bank details (bank name, account number, contact details, etc.) are different. I use layers when I design checks for clients that shareholders can receive dividends with the details of different banks.
Preparing to work with layers
Before you start working with a new CorelDRAW document, you need to do some preliminary preparation. I prefer to determine the overall design of the project, its contents, and the approximate placement of objects in advance.
Creation multi-page document with layers
The first step is to specify the page size of our project when opening a new document. By default, CorelDRAW creates a new document with one layer, called Layer 1. Open the Object Manager settings window ( Window>Settings windows>Object Manager).
The second step is to create the required number of template layers by pressing a button Create a master layer(see Fig. 1, element 5) in the object manager settings window. Master layers will appear on all pages of your project. Then create the desired number of layers by clicking the button Create Layer(see Fig. 1, element 4).
This article covers images from the Calender job. I used four layers and two master layers.
Your page is now ready to go.
Advice. CorelDRAW creates new layers on top of existing ones. Therefore, they must be created in the order in which they should be located in the project.
The third step is to create 11 copies of the open page to get 12 pages. Click tab Page 1 located at the bottom of the application window, and select the option from the drop-down menu Duplicate page. Since you haven't added objects to the page yet, leave it in the window Duplicate page default settings and click the button OK.
Note. When choosing a team Layout>Inserting a page pages are added to the file, which by default contain one layer. In this case, all the necessary layers must be added to each page separately, which can be time consuming.
After completing the three steps above, your wall calendar document will be ready to use.
Before we look at the example, I would like to talk about some important features of the object manager.
Introducing the Object Manager setup windows
The Object Manager settings window (Fig. 1) allows you to view the current state of the document structure, simplifying the management of layers and objects. This window shows all the pages of the active document with all the layers on each page and the objects that are on each layer on each page.
Rice. 1 - Object Manager
(for clarity, the user interface is shown in English)
Below are descriptions of the elements in Fig. 1.
1 - button Show object properties.
If this button is clicked, the properties of all objects in the selected layer will be shown. If you click the "+" symbol at the beginning of any page, the Object Manager setup window will provide detailed information about all objects.
2 - button Edit Unclosed Layers.
Clicking this button allows you to work with any object on any layer, regardless of whether it is active. If this button is not pressed, to work with objects on any layer, you must first select and make the corresponding layer active. In other words, all objects on all layers except the active one will be temporarily locked and unavailable for use.
3 - button Layer manager view.
Enabling this view allows users to control the hierarchy (or sequence) of layers and change their location.
4 - Button Create Layer.
Create a layer on the active page.
5 - Button Create a master layer.
Creating a template layer on the main page of the document.
6 - Button Delete layer.
Deletes the selected layer and all objects on it.
7 - Setting up regular layers added to the page. By default, CorelDRAW gives layers sequential names (for example, Layer 2, Layer 3, etc.). To improve your experience and make it easier to find the layers you need, you can rename them.
8 - Default template layers. The Guides, Desktop, and Grid layers are the default layers. They cannot be removed from the document.
9 - Setting up template layers added to the main page and renamed.
Now let's look at the layer properties buttons. Each layer has three buttons that help you change the properties of that layer.
Icon eyes indicates whether the layer is visible. If this icon is clicked, the layer objects are visible, and if not clicked, they are hidden.
Icon printer controls whether a layer can be printed. If this icon is clicked, layer objects can be printed and imported, otherwise they cannot be.
Icon pencil indicates whether the layer is editable. If this icon is clicked, layer objects can be selected and edited, otherwise they cannot.
Advice. Typically, visibility and printability are turned on and off at the same time. Remember that a visible layer cannot be exported or printed if printing is disabled. If printing is enabled, then you can even export and print an invisible layer.
You can also make a layer visible but not print it, so that project notes are not printed. I use a layer like this to store print settings and other job information that needs to be available at all times.
Rice. 2
(for clarity, the user interface is presented in English)
Now we'll look at how to use the Layer Manager view. This view allows you to change the order of layers on the active page. In Fig. Figure 2 shows the order of layers on the page "Page: 6: June".
If necessary, layers can be moved to any desired position.
Advice. The Layer Manager view allows you to toggle the visibility of layers, as well as the ability to edit and print them.
For this demo assignment I will need the following layers:
- two template layers;
- four layers on each page.
Rice. 3
Background template layer
We have created two template layers: the first one will contain all the objects necessary to create the general background of all pages,
and on the second - the names of the days of the week common to all pages.
Since the project uses two template layers, they must be placed in different sequences.
Normal background layer
On each page I use four layers on which I add dates, advertisements, a logo, the name of the month, as well as photos and background images.
Dates(Dates): Each page shows the dates of each month on that layer.
Logo&Month(Header and Month): This layer contains the main header and month name.
Back & Photos(Background Image and Photos): On this layer I placed the photos and objects used to create the background of each page. Since each page must contain different photos and objects, this layer is created on all pages.
The order of layers and placement of objects in a 12-page calendar
Rice. 4
Background(Background): template layer.
Bottom layer. Objects that must be visible and can be printed on all pages.
Rice. 5
Back & Photos(Background Image and Photos): Normal layer.
Second layer from bottom. Unique objects placed on each page. Each page contains different photographs and objects.
Rice. 6
Logo&Month(Footer and Month): Normal layer.
Third layer from bottom. Unique objects placed on each page. Each page displays the name of the new month and uses a unique font color for the company name.
Rice. 7
The fourth layer from the bottom. Each page advertises different services. The placement of advertisements varies from page to page.
Corel CorelDRAW Home & Student Suite X8
Take advantage of CorelDRAW® Home and Student Suite X8 to create projects for your home and school.
The new version of CorelDRAW Home & Student Suite X8 for home and study offers professional graphics quality and extensive photo processing capabilities at an affordable price. Includes easy-to-use tracing, layout, and photo editing tools found in Corel® PHOTO-PAINT® and Corel® AfterShot™. CorelDRAW Home & Student Suite X8 for home and school is designed for hobbyists and students of all skill levels, cost-effectively, and allows you to quickly and confidently create logos, newsletters, reports, photography projects and social media content.


