Подписка на новости. Умный браслет I5 Инструкция на русском Принцип функционирования системы
Умный браслет I5
Совместимость
Умный браслет поддерживает следующие мобильные устройства:
IOS: ОС должна быть IOS 7.0 или позднее, Bluetooth 4.0; такие как iPhone 4S, 5, iPod touch5 и т.д.
Android: OC должна быть Android 4.3 или позднее, Bluetooth 4.0; такие как Samsung S4, Note3 и т.д.
Функциональные значки
Время:
Калории:
Сигнал о подвижности:
Bluetooth:
Шаги:
Будильник:
Оповещение о звонке:
Автокамера:
Расстояние:
Мониторинг сна:
Оповещение SMS:
Bluetooth вещание:
Гид по началу работы
1. Зарядите
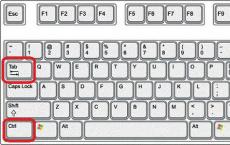
Зарядите браслет в течение 30 минут перед началом пользования. Вытащите хост как показано на картинке. Вставьте хост в USB порт 5В/1А для зарядки. Индикатор красного цвета перестанет мигать, когда устройство зарядиться полностью за 30 минут.
2. Установите приложение
Войдите в App Store или Google play store, скачайте приложение «Zeroner» и установите его. Перед началом использования приложения Zeroner убедитесь, что ваш телефон подключен к интернет через Wi-Fi или или 3G.
3. Установка аккаунта
Откройте приложение Zeroner. Войдите в аккаунт если он создан или зарегистрируйте новый.
4. Соединение
Включите Bluetooth и Wi-Fi на телефоне.
1) Войдите в приложение Zeroner, на главную страницу, нажмите на кнопку в верхнем левом углу или проведите по экрану слеву направо и кликните Настройки устройства.
2) Кликните дважды на кнопку на браслете, на нем появится иконка поиска. Нажмите кнопку Поиск устройства в приложении, выберите соединяемое устройство из появившегося списка и подождите 1-2 сек.
3) На Android устройстве появится всплывающее окно Запрос подключения, выберите подтвердить, соединение установлено.
4) На IOS устройстве появится всплывающее окно Запрос Bluetooth соединения, выберите соединить, соединение установлено.
Примечание: Если всплывающее окно не появилось в течение 1 мин. Повторите предыдущий шаг.
5. Синхронизация данных
Браслет синхронизирует данные автоматически после соединения с телефоном через приложение Zeroner, время на браслете будет отображено такое же как на телефоне. Синхронизованные данные включают: шаги, калории, расстояние. Вы можете проверить успешную синхронизацию данных в приложении. Первый раз синхронизация занимает 1-2 минуты. Синхронизация данных может быть осуществлена вручную нажатием кнопки Обновить в приложении.
6. Мониторинг сна
Включите режим сна: удерживайте кнопку на браслете до двух вибраций, браслет перейдет в режим мониторинга сна, появится иконка.
Выход из режима сна: удерживайте кнопку на браслете до двух вибраций, браслет выйдет из режима мониторинга сна, на браслете снова появится индикация времени.
7. Сброс браслета
Удерживайте кнопку на браслете до 3 вибраций, экран погаснет, индикация белого цвета появится 1 раз - перезагрузка браслете завершена. Сброс не удалит записываемые данные.
8. Больше функций вы узнаете, используя приложение Zeroner.
Вопросы и ответы
1. В: Браслет не может выйти из режима сна нажатием на кнопку
О: Сделайте сброс, чтобы выйти из режима сна
2. В: После соединения с приложением, синхронизация данных закончилась, но время на браслете отображается неправильно.
О: Сделайте сброс и синхронизируйте снова
3. В: После соединения с приложением, браслет не показывает номер звонящего абонента.
О: Телефон на Android: После соединения браслета с приложением, нужно разрешить Zeroner видеть звонки, SMS, контакты и оставить программу включенной в фоновом режиме. Если на вашем телефоне установлены программы безопасности, добавьте приложение Zeroner к проверенным ресурсам.
IOS: Если у вас Iphone, перезагрузите телефон и снова соедините с браслетом. При соединении дождитесь всплывающее окно «запрос соединения Bluetooth» и нажмите соединить, функция определения номера на браслете должна заработать.
4. В: Браслет показывает значок Bluetooth и соединен с приложением, но приложение не может синхронизовать данные.
О: В основном, причиной этому может являться Bluetooth на телефоне. Пожалуйста, сначала закройте приложение, затем перезапустите Bluetooth на телефоне. Если это не помогает, перезагрузите телефон и повторите попытку.
5. В: Почему браслет часто теряет связь с телефоном?
О: Проверьте настройки безопасности телефона или программ входит ли приложение Zeroner к достоверным ресурсам, если нет добавьте его и попробуйте снова.
6. В: Браслет водонепроницаемый?
О: Браслет только водоустойчивый (IP55), пожалуйста, снимайте браслет в душе или при плавании.
Ежегодно все большее количество заядлых курильщиков желает познакомиться с системой нагревания табака под названиемiQOS . Новичкам бывает непросто сходу разобраться в специфике эксплуатации новомодного электронного девайса. Чтобы облегчить себе задачу вначале эксплуатации приспособления, советуем ознакомиться с подробной инструкцией, представленной в нашей небольшой статье.
Принцип функционирования системы
IQOS работает от заряда портативного чарджера, который составляет основу гаджета. Конструктивный элемент питается энергией от стандартной электросети путем подключения через кабель с адаптером. Накопленной энергии достаточно на более чем десяток зарядок держателя табачных стиков, который вставляется в специальный слот чарджера на 3-6 минут каждый раз перед сеансом курения. После использования держатель можно отложить в сторону и устройство самостоятельно перейдет в спящий режим. Указанный принцип работы системы чрезвычайно удобен для пользователя. Поскольку не заставляет владельца устройства задумываться ни о чем, помимо своевременной зарядки.
Инструкция
Перейдем непосредственно к эксплуатации системы iQOS. Чтобы электронный девайс демонстрировал стабильную работу и радовал своей практичностью, действовать рекомендуется согласно такой схеме:
- Перед сеансом употребления табачных испарений нужно убедиться, что держатель стиков полностью заряжен. Проверить количество энергии можно, кликнув на клавишу «Fire», расположенную в центральной части конструктивного элемента. Если результатом станет свечение индикаторного маячка зеленым цветом, значит, все в порядке и держатель табачных стиков готов к использованию. Красный огонек подскажет о необходимости возвращения держателя в чарджер на подзарядку.
- Следующий шаг заключается в подготовке табачного стика. Изделие вставляется свободным окончанием в держатель. Затем выполняется легкое надавливание на фильтр. Стик должен зафиксироваться на лезвии накаливания устройства, которое содержится на дне держателя.
- Далее осуществляется удержание клавиши продолговатой формы, которая находится ниже светового индикатора на корпусе держателя стиков. Действие позволяет запустить процедуру нагревания системы и соответственно табачного изделия.
- Кнопка «Fire» удерживается, пока система не подаст вибрирующий сигнал. Обычно на качественный разогрев табака и высвобождение испарений из устройства уходит порядка 20 секунд. Далее можно спокойно переходить к сеансу курения.
Инструкция для сигарет iqos идет в комплекте к каждому устройству. Она описывается особенности эксплуатации прибора. Но иногда у пользователя остаются дополнительные вопросы, которые в полной мере раскрыты в представленной статье.
Iqos имеет определенные особенности использования. Как , детально расписано в инструкции. Важно соблюдать последовательность всех процессов, чтобы прибор долгое время демонстрировал отменную работу.

Русская инструкция по применению iqos прилагается в комплекте к прибору. Согласно ей, первым делом, необходимо проверить заряд аккумулятора. Об этом уровне свидетельствует световой индикатор. Разрешается пользоваться держателем, если свет не будет мигать.
Дальше потребуется вставить стик. Достаточно просто ввести его в держатель к определенной отметке. Дальше нужно немного надавить на сигарету, чтобы надеть фильтр на лезвие. Если во время процесса возникают трудности, то нужно прочистить устройства от табака.
Затем нужно зажать кнопку на держателе. Она активизирует нагревание табака. Спустя 20 секунд можно почувствовать вибрирующий сигнал, который указывает на то, что можно смело начинать использовать iqos.
Нет четких правил, которые регламентируют процесс курения. Он не отличается от употребления обычных сигарет. У курильщика есть 14 затяжек, после чего устройство потребуется зарядить. Об окончании попыток свидетельствует вибросигнал, дым теряет свою интенсивность.
После окончания курения необходимо подождать, пока лезвие остынет, а затем извлечь пепел. Это выполняется достаточно легко с помощью поднятия колпачка. Если возникнут трудности, то придется применить щеточку.
Первое включение
Включение iqos первый раз является волнительным процессом. По началу, все кажется таким непонятным и сложным. В комплекте с прибором идет инструкция, которая поможет выполнить все правильно.
Инструкция по применению iqos:
- Для начала потребуется зарядить держатель стиков. Проверить уровень готовности прибора к работе можно, если нажать на кнопку «Fire». Она находится в центральной части устройства. Зеленый свет индикатора говорит, что держатель готов к использованию. Если цвет красный, то для прибора потребуется подзарядка. Впрочем, это не займет много времени.
- Затем нужно подготовить стик. Свободный конец сигареты должен быть вставлен в держатель до отведенной отметки. Потребуется небольшим нажатием насадить фильтр на лезвие. Стик должен быть плотно зафиксирован в держателе.
- Ниже светового индикатора находится овальная клавиша. Ее потребуется зажать. Так система начинается прогреваться, готовиться к использованию.
- О готовности iqos свидетельствует вибросигнал. На это уходит 20 секунд. После этого можно начинать курение.
Вот так просто получается включить iqos. Это последовательный процесс, который постепенно человек начинает выполнять на автомате. Главное сразу научится делать все правильно, не допускать ошибок, чтобы прибор долго и исправно прослужил.
Как правильно вставлять стик?

Приобрести стик с понравившемся вкусом можно в специализированных магазинах. Чтобы начать процесс курения, сигарету необходимо вставить в держатель. В руководстве пользователя четко прописано, к каким границам нужно вставлять папиросу. Для удобства на самом стике есть отметки. При наличии сопротивления потребуется надавить на сигарету. Благодаря этим действиям фильтр насаживается на лезвие. Оно изготовлено из керамики и используется для фиксации стиков. При наличии трудностей нужно прочистить держатель от остатков табака.
После каждого курения нужно извлекать стик из держателя. Достаточно просто поднять колпачок и вытащить папиросу. Остатки горения можно вынуть, попытавшись насадить их на оболочку папиросы. Если табак остался внутри, то потребуется чистка. Повторное использование стиков запрещается.
Чтобы , необходимо снять колпачок. Это детально расписано в инструкции для электронной сигареты. Внутрь держателя нужно опустить щеточку и начать круговые движения. Щеточка находится в комплекте с устройством. Если возникают трудности, то можно попробовать извлечь табак с помощью крючка.

Как зарядить первый раз?

Инструкция по использованию описывает, как заряжать держатель впервые. Для начала потребуется проверить уровень заряда. Об этом свидетельствует световой индикатор. Если нажать на кнопку «Fire», то может зажечься зеленый или красный свет. Первый вариант свидетельствует о хорошем заряде. Во втором случае потребуется подзарядка. Держатель вставляется в зарядное устройство. Спустя 4-6 минут iqos готов к эксплуатации.
Наша цель - обеспечить Вам самый быстрый доступ к руководству по эксплуатации устройства SciPhone + I68 . Пользуясь просмотром онлайн Вы можете быстро просмотреть содержание и перейти на страницу, на которой найдете решение своей проблемы с SciPhone + I68 .
Для Вашего удобства
Если просмотр руководства SciPhone + I68 непосредственно на этой странице для Вас неудобен, Вы можете воспользоваться двумя возможными решениями:
- Полноэкранный просмотр -, Чтобы удобно просматривать инструкцию (без скачивания на компьютер) Вы можете использовать режим полноэкранного просмотра. Чтобы запустить просмотр инструкции SciPhone + I68 на полном экране, используйте кнопку Полный экран .
- Скачивание на компьютер - Вы можете также скачать инструкцию SciPhone + I68 на свой компьютер и сохранить ее в своем архиве. Если ты все же не хотите занимать место на своем устройстве, Вы всегда можете скачать ее из ManualsBase.
Руководство по эксплуатации SciPhone + I68
Advertisement
Advertisement
Печатная версия
Многие предпочитают читать документы не на экране, а в печатной версии. Опция распечатки инструкции также предусмотрена и Вы можете воспользоваться ею нажав на ссылку, находящуюся выше - Печатать инструкцию . Вам не обязательно печатать всю инструкцию SciPhone + I68 а только некоторые страницы. Берегите бумагу.
Резюме
Ниже Вы найдете заявки которые находятся на очередных страницах инструкции для SciPhone + I68 . Если Вы хотите быстро просмотреть содержимое страниц, которые находятся на очередных страницах инструкции, Вы воспользоваться ими.
SciPhone i68 Quad band Cell Phone User Manual
© 2008 SciPhone Inc. All rights reserved.
SciPhone, the SciPhone logo are trademarks of SciPhone Inc., registered in the U.S. and other countries. SciPhone is a trademark of SciPhone
®
word mark and logos are owned by the Bluetooth SIG, Inc. and any use of such marks by SciPhone Inc. is under license.
Inc. The Bluetooth
052-9567-A
Printed in China
SciPhone i68 Quad band Cell Phone User Manual Welcome to use our products Welcome to use our SciPhone i68, a quasi-smart quad-band GSM phone with hand-write input and LCD touch-screen. The phone will enable you to have great user experience with its versatile functions such as, humanized design, portable mini-camera, mini movie-clip display, fashionable MP3, convenient touch-screen, unrestricted extension of JAVA and stereo FM. You should pay close attention to the following safety info
SciPhone i68 Quad band Cell Phone User Manual Features and functions Handheld PDA Quadruple bands: GSM850, GSM900, DCS1800, PCS1900 MHz Hand-write input is supported LCD touch-screen Virtual keypad Sports sensor (shake to change idle screen picture or rotate picture) Double-card single-standby Camera on the phone Movie clip on the phone MMS WAP JAVA FM stereo radio MP3 MP4 movie display recording 3.2 inch super color screen Chord music ring tone T-Flash car
SciPhone i68 Quad band Cell Phone User Manual 1.2 Key definitions (1) functional keys ◇ This phone incorporates all functional keys in one key. Press the functional key to activate the screen and roll the direction keys under the screen rightward to enter menu. ◇ You can use the shortcut keys at the bottom of the screen for relevant operations. ◇ Long press to power on/off. (2) Volume keys ◇ You can adjust the call volume while making calls. ◇ You can also adjust the volume when pla
SciPhone i68 Quad band Cell Phone User Manual preference settings in phone setting and select “line switch”. Note: Your SIM card keeps your telephone numbers, PIN, PIN2, PUK, and PUK2, network information, phone book and SMS data. Please use your SIM Card carefully and avoid scratching and bending your SIM card. Keep it out of the reach of your children. 2.4 How to remove your SIM card Power off, remove the battery cover and the battery, and push the SIM card outward until fully push
SciPhone i68 Quad band Cell Phone User Manual cards; the names vary from producer to producer. First power off and remove the battery, push the T-Flash card slot upward and slightly pull it outward and insert your TF card into the slot with the nicked corner on the right and the metal contact points facing inward, and then cover the slot. Note: TF card requires anti-static operation; do not place your TF card in your pocket, do not touch the metal contact points and keep it out of the rea
SciPhone i68 Quad band Cell Phone User Manual 3.3 How to dial an international call (1) long press the *key until you see the “+” sign, which is a code for international call. (2) enter the country code, district number and telephone number. (3) click the dial key. Note: In some networks, the “+” sign is not a code for international calls. 3.4 Answer a call Click the “answer” key to answer a call; click the “reject” key to reject. Note: To answer a call, you should not activate the “c
SciPhone i68 Quad band Cell Phone User Manual General instructions for music player: Previous music Play/pause, play or pause the music Stop, stop the music Next music While playing music, you can click “list’ to view all the music items in your phone. For every piece of music, you can do the following operations: Play: play the selected music (while playing, you can click the functional icons on the screen, such as volume). Detail: view the details of the selected music. Add t
SciPhone i68 Quad band Cell Phone User Manual the original setting and then reset the values. 4.4 Camera Click “camera” in the main menu. You can use the screen to catch the view and then press the camera icon at the bottom of the screen to take a photo when you feel satisfied. The phone will give a shutter sound if you have set it. In order to take a good picture, you should be familiar with the camera settings in addition to maintaining balance. In the camera mode, you can set the foll
SciPhone i68 Quad band Cell Phone User Manual Setup: set the speaker parameters to play the radio program through the headset. 4.8 DIY melody Use this function to create your own melodies. 4.9 Game This phone incorporates built-in intelligent jigsaw puzzle, and you can set the music effects and vibrations to your own preferences. Enter this function and then use the left/right direction keys to start or exit. More games are available with the JAVA function. 5 Phone book This functio
SciPhone i68 Quad band Cell Phone User Manual ·Export to Storage: This function allows you export your phone book in PHB format to your extended storage device. If you change your SIM card or your phone, you can copy the data to your computer and send the file (phone book) back to your new phone or new SIM card with the archive management tools. ·Caller picture: If you set a caller picture for a number, the picture will be displayed when the person calls; ·Caller ring tone: If you set a
SciPhone i68 Quad band Cell Phone User Manual the following operations are available: Send: directly send the edited message. Save and send: send the edited message and save it to outbox as well. Save: save the message to outbox without sending it. Send to many: first edit the “send to many” list, adding the multiple receivers to the list and then send out at once. Send by group: send to every member of a group of people in the phone book. (4)Common phrases: Some common phrases have
SciPhone i68 Quad band Cell Phone User Manual Compose: the relevant settings for editing MMS, with many options for adjustment. Send: the relevant settings for sending MMS. Receive: the relevant settings for receiving MMS. Filter: the restrictive settings for receiving MMS. Server profile: select the active network server for the multimedia messaging service. Please select the correct server that matches your SIM card. Consult your network service provider if necessary. Memory status: v
SciPhone i68 Quad band Cell Phone User Manual 8 Calendar This allows you to view the status of a certain date and its lunar date. Click “calendar” to enter this function and the current month will be displayed on the screen. Click the “option” for the following menus: Itinerary: view the memos /to-do-list. Jump to: click this option and enter the date, then press “enter” to jump to this date. Lunar calendar: Click “lunar calendar” to activate or deactivate the “lunar calendar” viewing f
SciPhone i68 Quad band Cell Phone User Manual 11 JAVA Java technology makes your phone infinitively extendable and gives it the features of a quasi-smart phone, by allowing you to install JAVA software to your phone. You can find abundant free JAVA software online, such as various office software and games; and you can also log on to our technical support website. Not all JAVA software can run on this phone and some of the software may bring the phone to go numb, as JAVA software may take
SciPhone i68 Quad band Cell Phone User Manual to convert from, click “ok” on the bottom left side of the screen to view the result. 14.3 Bluetooth This phone is designed with built-in Bluetooth technology, through which you can connect your phone to other Bluetooth devices, such as hand-free Bluetooth devices, Bluetooth-compatible PC or other Bluetooth phones. With Bluetooth connection, you can exchange pictures, movie-clips, texts, name cards and so on. You can also use Bluetooth for m
SciPhone i68 Quad band Cell Phone User Manual 14.5 E-book With this you can conveniently view files in TXT format. Click to enter “E-book” and select the document you want to browse. Roll the scroll bar on the right to flip the pages. In the option menu, you have some operations available, such as Jump to, Add bookmark and Delete bookmark. 15 Settings You can conveniently have your favorite settings for some common functions of your mobile phone, such as call setting, phone setting, ne
SciPhone i68 Quad band Cell Phone User Manual This allows you to set the brightness and time of LCD back light. 15.3 Call settings This allows you to DIY your settings for dialing and receiving calls. 15.3.1 Call waiting This is used to set up whether to give prompt sound when there is an incoming call (which requires network support). If activated, the network will notify your phone to give corresponding sound prompt and display the number on the screen when there is an incoming call,
SciPhone i68 Quad band Cell Phone User Manual For every option, the following operations are available: ·Activate: activate the call barring function. Click “OK” to enter this function and the screen prompts you to enter the password. Enter the password and click “OK”; the screen will return the result of execution. ·Deactivate: deactivate the call barring function. Click “OK” to enter this function and the screen prompts you to enter the password. Enter the password and click “OK”; the
SciPhone i68 Quad band Cell Phone User Manual 15.4 Network setup 15.4.1 Network selection Two options available: automatic and manual selection (the former is recommended); by automatic selection, your mobile phone will search the network of the SIM card as a first choice; by manual selection, you need to select the network manually. 15.4.2 Preferred networks Select the preferred network service provider; by default the network of the currently used SIM card is to be displayed. You can c
Скачавание инструкции
| # | Руководство по эксплуатации | Категория | Скачать |
|---|---|---|---|
| 1 | Sony 1261-4434 | Cell Phone | 28 |
| 2 | Sony 1261-4174 | Cell Phone | 36 |
| 3 | Sony 1264-0776 | Cell Phone | 32 |
| 4 | Sony 1264-0770 | Cell Phone | 11 |
| 5 | Sony 1261-4451 | Cell Phone | 37 |
Перейти на страницу of 25
Summary
SciPhone I68 - page 1
SciPhone User Manual V1.0 © 2008 SciPhone Inc. All rights reserved. SciPhone, the SciPhone l ogo are tradem arks of Sc iPhone I nc., regi stered in the U. S. and ot her coun tries. Sci Phone is a trad emar k of SciPho ne Inc. The Bluetooth ® word mark and logos are owned by the Bluetooth SIG, Inc. an d any use of such marks b y SciPhone Inc. is u ...
SciPhone I68 - page 2
SciPhone W elcome to use our product s Welcome to use our SciPhone i68, a quas i-smart quad-band GSM phone with hand-write input and LCD touch-screen. T he phone will enable you to hav e great user experience with its versatile functions such as, hum anized design, portable mini-camera, mini movie-clip display , fashionable MP3, conveni ent touch-s ...
SciPhone I68 - page 3
SciPhone Features and functions Handheld PDA Quadruple bands: GSM850, GS M900, DCS1800, PCS1900 MHz Hand-write input is supported LCD touch-screen Virtual keyp ad S port s sensor (shake to change idle screen picture or rotate picture) Double-card single-standby Camera on the phone Movie clip on the phone MMS ...
SciPhone I68 - page 4
SciPhone 1.2 Key definitions (1) functional keys ◇ This phone incorporates all functional keys in one key . Press the functional key to activate the screen and roll the direction keys under the screen rightward to enter menu. ◇ Y ou can use the shortcut ke ys at the bottom of the screen for relevant operations. ◇ Long press to power on/off. (...
SciPhone I68 - page 5
SciPhone preference settings in phone setting and select “line switch”. Note: Y our SIM card keeps your telephone num bers, PIN, PIN2, PUK, and PUK2, network information, phone book and SMS dat a. Please use your SIM Card carefully and avoid scratching and bending your SIM card. Keep it out of the reach of your children. 2.4 How to remove your ...
SciPhone I68 - page 6
SciPhone cards; the names vary from producer to producer . First power off and remove the battery , push the T -Flash card slot upward and slightly pull it outward and insert your TF card into the slot with the nicked co rner on the right and the metal cont act points facing inward, and then cover the slot. Note: TF card requires anti-static operat ...
SciPhone I68 - page 7
SciPhone 3.3 How to dial an international call (1) long press the *key until you see the “+” si gn, which is a code for international call. (2) enter the country code, distri ct number and telephone number . (3) click the dial key . Note: In some networks, the “+” sign is not a code for international calls. 3.4 Answer a call Click the “an ...
SciPhone I68 - page 8
SciPhone General instructions for music player: Previous music Play/pause, play or pause the music S top, stop the music Next music While playing music, you can c lick “list’ to view all the music items in your phone. For every piece of music, you c an do the following operations: Play: play the selected music (while playi ng, you can click the ...
SciPhone I68 - page 9
SciPhone the original setting and then reset the values. 4.4 Camera Click “camera” in the main menu. Y ou can use the screen to catch the view and then press the camera icon at the bottom of the screen to take a photo when you feel satisfied. The phone will give a shutter sound if you have set it. In order to take a good picture, you should be ...
SciPhone I68 - page 10
SciPhone Setup: set the speaker parameters to play the radio program through the headset. 4.8 DIY melody Use this function to creat e your own melodies. 4.9 Game This phone incorporates built-i n intelligent jigsaw puzzle, and you can set the music effects and vibrations to your own prefer ences. Enter this function and then use the left/right dire ...
SciPhone I68 - page 11
SciPhone · Export to S torage: This functi on allows you export your phone book in PHB format to your extended storage device. If you change your SIM card or your phone, you can copy the data to your computer and send the file (phone book) back to your new phone or ne w SIM card with the archive management tools. · Caller picture: If you set a ca ...
SciPhone I68 - page 12
SciPhone the following operations are available: Send: directly send the edited message. Save and send: send the edited message an d save it to outbox as well. Save: save the message to out box without sending it. Send to many: first edit the “send to many” list, adding the multiple receivers to the list and then send out at once. Send by group ...
SciPhone I68 - page 13
SciPhone Compose: the relevant setti ngs for editing MMS, with many options for adjustment. Send: the relevant settings for sending MMS. Receive: the relevant se ttings for receiving MMS. Filter: the restrictive settings for receiving MMS. Server profile: select the active network server for t he multimedia messaging service. Please select the corr ...
SciPhone I68 - page 14
SciPhone 8 Calendar This allows you to view the status of a ce rt ain date and its lunar dat e. Click “calendar” to enter this function and the current month will be displayed on the screen. Click the “option” for the following menus: Itinerary: view the memos /to-do-list. Jump to: click this option and enter the date, then press “enter? ...
SciPhone I68 - page 15
SciPhone 11 J A V A Java technology makes your phone infiniti vely extendable and gives it the features of a quasi-smart phone, by allowing you to inst all JA V A software to your phone. Y ou can find abundant free JA V A software online, such as various of fice sof tware and games; and you can also log on to our technical support webs ite. Not all ...
SciPhone I68 - page 16
SciPhone to convert from, click “ok” on the bottom lef t side of the screen to view the result. 14.3 Bluetooth This phone is designed with built -in Bluetooth technolog y , th rough which you can conn ect your phone to other Bluetooth devices , such as hand-free Bluetooth devices, Bluetooth-compatible PC or other Bluetoot h phones. With Bluetoo ...
SciPhone I68 - page 17
SciPhone 14.5 E-book With this you can conveniently view files in TXT format. Click to enter “E-book” and select the document you want to browse. Roll the scro ll bar on the right to flip the pages. In the option menu, you have some operatio ns avail able, such as Jump to, Add bookmark and Delete bookmark. 15 Settings Y ou can conveniently have ...
SciPhone I68 - page 18
SciPhone This allows you to set the bri ghtness and time of LCD back light. 15.3 Call settings This allows you to DIY your settings fo r dialing and receiving calls. 15.3.1 Call waiting This is used to set up whether to give prom pt sound when there is an incoming call (which requires network support). If activated, the network will notify your pho ...
SciPhone I68 - page 19
SciPhone For every option, the following operations are available: · Activate: activate the call barring function. Click “OK” to enter this function and the screen prompts you to enter the p assword. Enter the password and click “OK”; the screen w ill return the result of execution. · Deactivate: deactivate the call barring function. Clic ...
SciPhone I68 - page 20
SciPhone 15.4 Network setup 15.4.1 Network selection T wo options available: automatic and manual selection (the former is recommended); by automatic selection, your mobile phone will s earch the network of t he SIM card as a first choice; by manual selection, you need to select the network manually . 15.4.2 Preferred networks Select the preferred ...
SciPhone I68 - page 21
SciPhone 15.5.4 Fixed dial If this function is supported by your SIM card, you can define the outgoing calls. If activated, you can only dial the numbers t hat are stored in the ph one book. The PIN2 code is required for this operation. Note: If you have entered the PIN2 password afte r power-on, you won’t need to enter it again before you power ...
SciPhone I68 - page 22
SciPhone (4) Ring type This means how the sound of the ri ng tones is to be delivered. (5) Prompts It means whether alarm sound, errors, network connection sound a nd call connection is activated. (6) Answer mode This means whether you can press any key to answer the phone when there is an incoming call. 16 Archive management This function allows y ...
SciPhone I68 - page 23
SciPhone Switch: In editing status, you can click t he icon on the bottom right side of the screen to switch to other input methods. 17.2 Write message Y ou can use the hand-write pen to input di rectly , which is simple and fast. 17.3 English and Numeric input Directly choose the Englis h letters or numbers. 18 Service and Maintenance 18.1 Service ...
SciPhone I68 - page 24
SciPhone connected with the card slot. with clean cloth. No network service 1. SIM card is invalid. 2. Out of service area. 3. Poor signal reception. 4. Incorrect line switch. 1. Contact your NSP . 2. Check the service areas of NSP . 3. Move to the windows or switch to another service network. 4 . Switch to a correct line. Unable to send SMS Fail ...
SciPhone I68 - page 25
SciPhone IMEI: International mobile equipment i dentity , each mobile phone has a uniqu e corresponding 15-digit IMEI code. Appendix 2: T echnical specifications: Weight: 1 1 1g (with battery) Dimension: 1 15mm(H) × 60.5mm(W) × 1 1.5mm (T) S tandard battery: Lithium 3.7V 1200mAh S tandby hour: 160-28 0 h ours* T alk time: 210-300minutes* Screen: ...
Производитель SciPhone Категория Cell Phone
Документы, которые мы получаем от производителя устройства SciPhone I68 мы можем разделить на несколько групп. Это в частности:
- технические чертежи SciPhone
- инструкции обслуживания I68
- паспорта изделия SciPhone
- информационные брошюры
- энергетические этикетки SciPhone I68
Все из них важны, однако самую важную информацию с точки зрения пользователя мы найдем в инструкции обслуживания SciPhone I68.
Группа документов, определяемая как инструкции обслуживания, делится также на более подробные типы, такие как: Инструкции монтажа SciPhone I68, инструкции обслуживания, короткие инструкции или инструкции пользователя SciPhone I68. В зависимости от потребностей, Вам необходимо поискать требуемый документ. На нашем сайте Вы можете просмотреть самую популярную инструкцию использования изделия SciPhone I68.
Полная инструкция обслуживания устройства SciPhone I68, как должна выглядеть?
Инструкция обслуживания, определяемая также как пособие пользователя, или просто "руководство" - это технический документ, цель которого заключается в использовании SciPhone I68 пользователями. Инструкции пишет, как правило технический писатель, языком, доступным для всех пользователей SciPhone I68.
Полная инструкция обслуживания SciPhone, должна заключать несколько основных элементов. Часть из них менее важная, как например: обложка / титульный лист или авторские страницы. Однако остальная часть, должна дать нам важную с точки зрения пользователя информацию.
1. Вступление и рекомендации, как пользоваться инструкцией SciPhone I68
- В начале каждой инструкции, необходимо найти указания, как пользоваться данным пособием. Здесь должна находится информация, касающаяся местонахождения содержания SciPhone I68, FAQ и самых распространенных проблем - то есть мест, которые чаще всего ищут пользователи в каждой инструкции обслуживания
2. Содержание
- индекс всех советов, касающихся SciPhone I68, которое найдем в данном документе
3. Советы по использованию основных функций устройства SciPhone I68
- которые должны облегчить нам первые шаги во время использования SciPhone I68
4. Troubleshooting
- систематизированный ряд действия, который поможет нам диагностировать а в дальнейшем очередность решения важнейших проблем SciPhone I68
5. FAQ
- чаще всего задаваемые вопросы
6. Контактные данные
Информация о том, где искать контактные данные производителя / сервисного центра SciPhone I68 в данной стране, если самостоятельно не получится решить проблему.
У вас вопрос, касающийся SciPhone I68?
Воспользуйтесь формуляром, находящимся ниже